
Installation Instructions

1
All Rights Reserved
Printed in the USA
2001 by The Toro Company
8111 Lyndale Avenue South
Bloomington, MN 55420-1196
Hydraulic Reservoir Kit
Groundsmaster
455D
Part No. 104–0165
Form No. 3326-595
Installation Instructions
Draining Hydraulic Tank
1. Turn engine off, release hood latch and raise hood.
2. Remove drain plug from rear of reservoir and
hydraulic line from front of reservoir (Fig. 1) and let
hydraulic oil flow into drain pan. Dispose of the oil
properly.
1
3
4
5
6
7
8
9
10
11
To pump
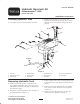
Figure 1
1. Drain plug
2. Hydraulic line (drain)
3. Suction hose
4. 90 degree fitting
5. Suction strainer
6. Hose clamp
7. Hydraulic tank cap
8. Shoulder screw
9. screen filter
10. D–ring, retainer & screw
11. Sight gauge
Removing Hydraulic Tank
1. Remove hose clamps securing suction hose to 90
degree fitting on hydraulic tank suction strainer and
from fitting on hydraulic pump (Fig. 1). Discard hose
but retain hose clamps.
2. Disconnect all remaining hydraulic lines, fittings and
plugs from hydraulic tank (Fig. 1).
3. Remove (4) bolts and washers securing hydraulic tank
to frame and remove tank. Retain mounting fasteners
(Fig. 1).
4. Remove and retain the hydraulic tank cap, shoulder
screw and screen filter from filler neck of hydraulic
tank (Fig. 1).
5. Remove and retain the (4) D–rings, retainers and
screws from top of hydraulic tank (Fig. 1).