
Installation Instructions

2
Installing the Z320 Series
Gearbox
Note: Each gearbox assembly has three individual fluid
boxes.
Removing the Gearbox
1. Remove blades and blade retainers from beneath
mower. Save the square key from each gearbox output
shaft for use with the new gearbox.
2. Remove any guards connected to the existing gearbox,
and disconnect drive shaft.
3. Remove and discard the existing gearbox mounting
bolts (8).
4. Remove existing gearbox from top of mower.
Installing the Gearbox
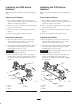
1. Place new gearbox on mower. The vertical output
shafts should be centered in the two cone–shaped
recesses in the top of the mower (Fig. 3).
2. Insert bolts, with washers, through mounting brackets
and into gearbox mounting holes (Fig. 3). Torque
mounting bolts to 260 ± 25 in.–lbs.
Important Torque mounting bolts to 260± 25 in.–lbs.
Bolts have pre–applied thread locker.
3. Connect driveshaft to gearbox (use new spring pin
included in kit). Attach any guards that were removed
for assembly, and connect blade assemblies to new
gearbox.
m–4629
1
2
3
4
5
Figure 3
1. Gearbox
2. Bolt
3. Washer
4. Pin
5. Decal
Installing the Z350 Series
Gearbox
Note: Each gearbox assembly has three individual fluid
boxes.
Removing the Gearbox
1. Remove blades and blade retainers from beneath
mower. Save the square key from each gearbox output
shaft for use with the new gearbox.
2. Remove any guards connected to the existing gearbox,
and disconnect drive shaft.
3. Remove and discard the existing gearbox mounting
bolts (8).
4. Remove existing gearbox from top of mower.
Installing the Gearbox
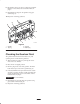
1. Place new gearbox on mower. The vertical output
shafts should be centered in the two cone–shaped
recesses in the top of the mower (Fig. 4).
2. Insert bolts, with washers, through mounting brackets
and into gearbox mounting holes (Fig. 4). Torque
mounting bolts to 260 ± 25 in.–lbs.
Important Torque mounting bolts to 260 ± 25 in.–lbs.
Bolts have pre–applied thread locker.
3. Connect driveshaft to gearbox (use new spring pin
included in kit). Reattach any guards that were
removed for assembly, and connect blade assemblies
to new gearbox.
1
2
3
4
5
m–4957
Figure 4
1. Gearbox
2. Bolt
3. Washer
4. Spring Pin
5. Decal