
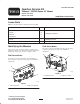
Installation Instructions

3
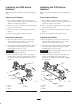
Installing the Decal
A new decal has been provided to replace the existing
gearbox lubricant decal on the mower. This is for both
Z320 and Z350 series gearboxes.
1. Thoroughly clean mower in area of lubrication decal.
Install new decal over the existing decal (Fig. 3 and 4).
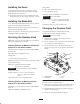
Installing the Blade Bolt
A new blade bolt (lefthand threaded) has been provided to
replace the existing right hand blade bolt.
Note: Determine the left and right sides of the machine
from the normal operating position.
Refer to the operator’s manual for the correct procedure of
installing the blades and blade bolt.
Servicing the Gearbox Fluid
Note: Make sure to use the correct fluid for your machine.
There are two different types of fluid.
Gearbox Fluid for all Mowers
without
the
letters
TE
in the model number.
The following is an exmaple of a model number without
the letters TE.
Model No. 74195—210000001 and Up
Change fluid:
• after initial 100 operating hours.
Note: Fluid will not have to be changed again after initial
100 hour fluid change.
Fluid Type: Automatic Transmission Fluid
(Dexron III or equivalent)
Important Do not mix fluids. Use only Automatic
Transmission Fluid.
Gearbox Capacity: 5–1/2 oz. (129.6 ml) each box
16–1/2 oz. (488 ml) for all three
boxes
Check fluid: After every 100 operating hours.
Gearbox Fluid for all Mowers
with
the
letters
TE
in the model number.
The following is an exmaple of a model number with the
letters TE.
Model No. 74804TE—220000001 and Up
Change fluid:
• after initial 100 operating hours.
• each year before storage.
Fluid Type: 85W–140 Mobilube or equivalent
Important Do not mix fluids.
Gearbox Capacity: 5–1/2 oz. (129.6 ml) each box
16–1/2 oz. (488 ml) for all three
boxes
Check fluid: After every 100 operating hours.
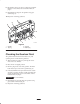
Changing the Gearbox Fluid
The gearbox fluid must be changed after first 100
operating hours. Change all three gearboxes.
Important Do not mix fluids.
1. Warm the fluid in gearbox by running the mower
mower for a few minutes.
2. For the 320 Series remove footrest and two shields that
cover gearbox and PTO shaft (Fig. 5).
3. For the 350 Series remove the mower footrest and
guards as necessary. This is not valid for all 350 Series
models.
2
1
3
3
4
m-4979
Figure 5
1. Gearbox Shield
2. PTO Shield
3. Screw
4. Nut
4. Raise mower to upright position.
5. With mower raised, remove plug on the bottom side of
the gearbox. Let fluid fully drain into a pan. (Fig. 6).
6. Reinstall the bottom plug into the gearbox using pipe
sealant on threads (Fig. 6).
7. Remove the top plug to fill gearbox (Fig. 6).