
Installation Instructions

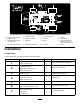


6
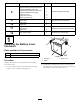
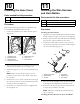
ApplyingtheSpray-Pro™
Decal
Partsneededforthisprocedure:
1Decal108-3308,Multi-Pro1200
1Decal108-3309,Multi-Pro1250
Procedure
Installthefollowingdecalsforappropriatemodelof
Multi-ProSprayer:
•Multi-Pro1200decalnumber—108-3308
•Multi-Pro1250decalnumber—108-3309
1.CleanthedecalareaaroundtheSpray-Promonitor
andmakesureitisfreeofdirt,grease,orother
foreignmaterial.
2.Removethetoppartofthedecalfromthebacking
andplaceitjustabovethedialonthemonitorface.
Besuretocovertheexistingcompletely.Repeatthe
processforthebottompartofthedecaljustbelow
thedial.
Important:Donotattempttoremovethe
dialtofacilitatetheinstallationofthedecals.
Removingthedialwilldamagetothemonitor
andyourabilitytomanipulatethecontrols.
Figure7
Multi-Pro1200decal,108–3308
1.Toppart2.Bottompart
Figure8
Multi-Pro1250decal,108–3309
1.Toppart2.Bottompart
7
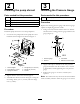
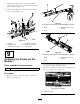
InstallingBrakeSwitch
Partsneededforthisprocedure:
1Brakeswitch
2
Bolt(5/16x5/8inch)
2Lockwasher
2
Nut(5/16inch)
Procedure
Installthebrakeswitchtooperatethetaillight.
1.Installthebrakeswitchtothebrakeleverusingthea
bolt(5/16x5/8inch),lockwasher,andnut(5/16
inch)asshownin
Figure9.
6