
Installation Instructions
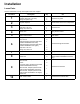
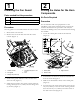
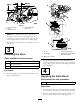
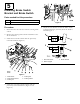
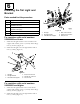
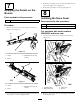
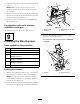
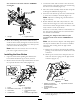
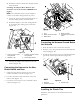

Figure3
1.Hornbuttonhole4.Dashscrewhead
2.Dash5.Horndecal
3.Steeringcolumn
Note:Somemachinesmayhaveacut-outin
thedashatthislocationinanticipationforthe
installationofthehornbutton.Ifso,simplypunch
outtheholeandcleanupanburrsorsharpedges.
5.Drillahole,1.59cm(5/8inch)indiameter,intothe
dashpanel.
3
InstallingtheHorn
Partsneededforthisprocedure:
1Horn
1
Bolt,5/16x3/4inch
1
Flangenut,5/16inch
Procedure
1.Bendthemiddletabattheendofthebrackettoa90
degreeangle(
Figure4).
Figure4
1.Horn
4.Flangenut(5/16inch)
2.Clutchplate
5.Bendthetabonbracketto
a90degreeangle
3.Bolt(5/16x3/4inch)
2.Installthebenttabintothebackholethatwas
previouslydrilled.Securethehorntotheclutchplate
usingabolt(5/16x3/4inch)andaangenut(5/16
inch)(Figure4).
4
ApplyingtheHornDecal
Partsneededforthisprocedure:
1Decal,horn
Procedure
1.Cleanthedecalareaabovethehornbuttonandmake
sureitisfreeofdirt,grease,orotherforeignmaterial.
2.Removethebackingofthenewdecalandplacejust
abovethehornbuttononthedash(Figure3).
4