
Installation Instructions

2
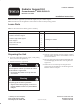
6. Disconnect the overflow bottle hose from the radiator
(Fig. 1).
7. Detach the air cleaner hose from the radiator support
(Fig. 1).
m–7516
1
3
4
2
Figure 1
1. Overflow hose
2. Radiator
3. Air cleaner hose
4. Radiator support
Removing the Radiator and
Supports
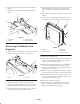
1. Remove the knobs securing the oil cooler to the radiator
support and pivot the oil cooler rearward (Fig. 2).
1
m–7517
1
2
Figure 2
1. Knobs 2. Oil cooler
2. Disconnect the (2) coolant hoses from the radiator.
3. Remove the four bolts and four washers securing the
shroud to the radiator. Retain all fasteners for later use.
4. Slide the shroud toward the engine, back over the fan,
to gain access to the fan and clutch assembly.
5. Remove the bolts and lock washers securing the fan and
clutch assembly to the engine. Remove the fan and
clutch assembly. Save the fasteners and parts for later
use.
6. Remove the shroud to make room for the removal of the
radiator.
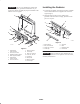
7. Remove the four bolts (5/16 x 5/8 inch) and lock nuts
(5/16 inch) securing the radiator to the support (Fig. 3).
m–7529
3
4
1
2
Figure 3
1. Radiator
2. Radiator support
3. Flange bolt,
5/16 x 5/8 inch
4. Locknut, 5/16 inch
8. Remove the radiator (Fig. 3).
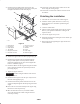
9. Remove the two flange bolts (5/16 x 5/8 inch) and the
two lock nuts (5/16 inch) securing the upper radiator
support to the base support (Fig. 4).
10. Remove the two flange bolts (3/8 x 1-1/4 inch) and the
two lock nuts (3/8 inch) securing the upper radiator
support to the frame. Remove the support and retain the
fasteners for later use (Fig. 4).
11. Remove and retain the upper bulb seal and foam angles
from the support. Discard the one piece support (Fig. 4).
12. Remove the flange bolts (1/4 x 5/8 inch) and the lock
nuts (1/4 inch) securing the radiator base support to the
vertical plates in the frame (Fig. 4).
13. Remove the radiator base support.
14. Remove and inspect the grommets, foam plugs and
strips, and bulb seals from the radiator base support.
Replace any items if necessary (Fig. 4).