
Installation Instructions

3
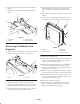
Important Take care to remember the position and
location of the plates, grommets and bulb seals as you
remove the radiator assembly for proper installation of the
radiator and new supports.
m–7518
3
7
1
2
3
4
8
6
10
11
12
13
9
14
5
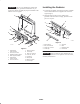
Figure 4
1. Flange bolts,
5/16 x 5/8 inch
2. Lock nut, 5/16 inch
3. Radiator support, original
4. Base support, radiator
5. Flange bolts,
3/8 x 1-1/4 inch
6. Lock nut, 3/8 inch
7. Bulb seal, upper
8. Foam strip
9. Bolt, 1/4 x 5/8 inch
10. Lock nut, 1/4 inch
11. Grommet
12. Base plate
13. Bulb seal, lower
14. Foam angle
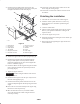
Installing the Radiator
1. Transfer the grommets, foam plugs and strips, and bulb
seals from the radiator base support to the new lower
support (Fig. 5).
2. Install the base bracket over the existing plate,
grommets and lower bulb seals (Fig. 5). Ensure foam
pieces are in place.
m–7528
4
1
7
8
6
5
3
2
Figure 5
1. Base support
2. Bolt, 1/4 x 5/8 inch
3. Flange nut, 1/4 inch
4. Foam strip
5. Grommet
6. Plate
7. Bulb seal, lower
8. Foam block
Important Ensure grommets, plate and bulb seals are
in the correct position to create a positive seal to the frame,
manifold, and hard lines.