
Installation Instructions


1
All Rights Reserved
Printed in the USA
2004 by The Toro Company
8111 Lyndale Avenue South
Bloomington, MN 55420-1196
Bearing Kit
Greensmaster
Flex 21
Part No. 107–8106
Form No. 3351–558
Installation Instructions
1. Remove the cap plug from the non drive plate on the
end of the groomer (Fig. 1).
1
Figure 1
1. Cap plug
2. Remove the flange nut securing the groomer shaft to
the non drive plate (Fig. 2). Hold the wrench flat on
the other end of the groomer shaft while removing the
nut.
3. Remove a bearing, spacer and another from the
groomer shaft in non drive plate (Fig. 2).
1
1
2
3
Figure 2
1. Bearing
2. Spacer
3. Flange nut
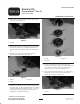
4. Insert the new bearings onto the groomer shaft in non
drive plate (Fig. 3). The extended bearing races should
contact each other when installed to create a 1/4” gap
between the bearings. Support the shaft to reduce
misalignment through the bearings.
1
2
2
1
3
Figure 3
1. Bearing
2. Bearing race
3. Flange nut
5. Secure groomer shaft to the groomer drive plate
assembly with a flange nut (Fig. 3). While holding the
wrench flat on the other end of the groomer shaft,
torque the nuts to 17–21 ft.-lb. (23–28 N⋅m).
6. Apply Loctite to the threads on the cap plug (Fig. 4).
Thread the cap plug into the groomer drive plate.
Torque the cap plug to 60–80 ft–lbs.
1
Figure 4
1. Cap plug