
Installation Instructions

1
All Rights Reserved
Printed in the USA
W 2005 by The Toro Company
8111 Lyndale Avenue South
Bloomington, MN 55420-1196
Headlight Power–Off Kit
Heavy–Duty Workman
)
Vehicles
Part No. 108–6930
Form No. 3352–745
Installation Instructions
Accidental starting of the engine could seriously
injure you or other bystanders.
Remove the key from the ignition switch before
you do any maintenance.
Caution
1. Stop the engine, set the parking brake and remove the
key from the ignition switch.
2. Remove the positive (+) battery cable from the battery.
3. Remove the (6) screws and nuts securing the bumper
to the vehicle frame and remove the bumper.
4. Remove the (7) screws securing the front hood to the
vehicle frame. Unplug the wire harness connectors
from both of the headlight wire connectors and remove
the hood.
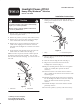
5. On the left side of the machine, locate the hole in the
inside wall of the vehicle frame tube (Fig. 3).
Note: If a hole is not present, measure 4 inches up from
the bottom of the frame tube and drill a .166” dia. hole
thru the inside wall of the tube (Fig. 1). Center the hole on
tube wall.
1
2
4.00”
Figure 1
1. Frame tube 2. Hole location
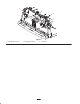
6. Mount the relay to the frame tube with the thread
forming screw included in the kit. Position the relay as
shown in figure 2.
11
2
Figure 2
1. Relay 2. Thread forming screw
7. Plug the connector, on the the kit’s wire harness, into
the relay (Fig. 3).
8. Route the harness along the frame tube (Fig. 3).
9. Plug the two wire harness connectors into the
headlight wire connectors (Fig. 3).
10. Plug the remaining harness connector to the ignition
switch “A” terminal (The open hole in switch
connector).
11. Secure the harness to the frame with the cable ties
(Fig. 3). Make sure the harness does not interfere with
any moving parts.
12. Install the hood and plug the wire harness connectors
into the headlight wire harness connectors. Secure the
hood to the frame with the fasteners previously
removed.
13. Reinstall the bumper to the frame with the fasteners
previously removed.
14. Connect the positive (+) battery cable to the battery.