
Installation Instructions


Installation
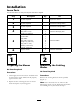
Loose Parts
Use the chart below to verify that all parts have been shipped.
Step
Description
Qty.
Use
1
No parts required
–
Prepare the mower.
2
No parts required
–
Remove the existing blades.
3
No parts required
–
Remove the existing bafes.
Discharge plate
1
Bolt (3/8 x 1 inch)
2
4
Flange nut (3/8 inch)
2
Install the discharge plate.
Left bafe
1
Center bafe
1
Right bafe
1
Bolt, (3/8 x 7/8 inch)
8
Flange nut, (3/8 inch)
8
Bolt, (3/8 x 1 inch)
1
Washer, (13/32 inch)
1
5
Locknut, (3/8 inch)
1
Install the bafes.
6
Recycler blades
3
Install the new blades.
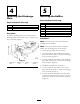
Step
1
Preparing the Mower
No Parts Required
Procedure
1. T horoughly clean mo w er dec k. All debris m ust
be remo v ed to ensure baffles will fit properly
ag ainst mo w er dec k.
2. R e pair all bent or damag ed areas of mo w er
dec k and re place any missing par ts .
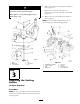
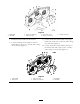
Step
2
Removing the Existing
Blades
No Parts Required
Procedure
R emo v e the existing blades from the spindles
( Figure 1 ).
Note: Sa v e the blades for use when in side
disc harging mode . Use the blade bolt and w asher
for installing the recycler blades in Ste p 4.
2