
Installation Instructions


A blade is shar p . Contact with shar p blade
can cause serious per sonal injur y .
W ear g lo v es or wrap shar p edges of the
blade with a ra g .
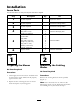
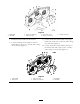
Figure 1
1. Blade
4. Spacer
2. Blade bolt 5. Thin washer
3. Curved washer
6. Nut
Step
3
Removing the Existing
Bafes
No Parts Required
Procedure
Note: In the ste ps belo w , the bolts are threaded
into the mo w er dec k. R emo v e the n uts first before
remo ving bolts .
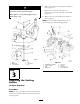
1. R emo v e the flang e n uts holding the baffles in
place ( Figure 2 ).
2. R emo v e the cam loc k and w asher b y
unscrewing it from the adjustable flo w baffle
( Figure 2 ).
3. R emo v e the six bolts holding the baffles in
place ( Figure 2 ).
Note: Sa v e the baffles and hardw are for use
when c hanging to side disc harging mode .
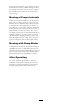
Figure 2
1. Adjustable Flow Bafe 5. Cam lock
2. Left front bafe 6. Washer
3. Bolt 7. Mower deck
4. Flange Nut 8. Discharge bafe
3