
Installation Instructions


Step
4
Installing the Discharge
Plate
Parts needed for this step:
1
Discharge plate
2
Bolt (3/8 x 1 inch)
2
Flange nut (3/8 inch)
Procedure
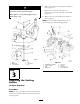
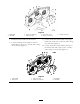
Install the disc harg e plate to the outside of the
mounting brac k et with 2 bolts (3/8 x 1 inc h) and 2
n uts (3/8 inc h) ( Figure 3 ).
Figure 3
1. Discharge
plate
2. Bolt (3/8 x
1 inch)
3. Nut (3/8
inch)
4. Mounting
bracket
Step
5
Installing the Bafes
Parts needed for this step:
1
Left bafe
1
Center bafe
1
Right bafe
8
Bolt, (3/8 x 7/8 inch)
8
Flange nut, (3/8 inch)
1
Bolt, (3/8 x 1 inch)
1
Washer, (13/32 inch)
1
Locknut, (3/8 inch)
Procedure
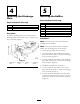
Note: All holes exist in the mo w er dec k for
installing the new baffles .
Note: Loosely install the baffles to align the
baffles with all existing holes in the mo w er .
1. Install the right baffle into the mo w er .
2. Loosely install the right baffle to the mo w er
dec k with 2 bolts (3/8 x 7/8 inc h) and 2 flang e
n uts (3/8 inc h) ( Figure 4 ).
3. Loosely install the right baffle to the disc harg e
plate with 1 bolt (3/8 x 7/8 inc h) and 1 flang e
n ut (3/8 inc h) ( Figure 4 ).
4. Install the left baffle into the mo w er .
5. Loosely install the left baffle to the mo w er
dec k with 2 bolts (3/8 x 7/8 inc h) and 2 flang e
n uts (3/8 inc h) ( Figure 4 ).
6. Loosely install the left baffle to the left front
of the mo w er dec k with 1 bolt (3/8 x 1 inc h), 1
w asher (13/32 inc h), and 1 loc kn ut (3/8 inc h)
( Figure 4 ).
4