
Installation Instructions
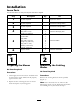


Step
6
Installing the New Blades
Parts needed for this step:
3
Recycler blades
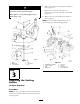
Procedure
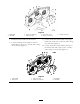
Important: T he sail par t of the blade (i.e.,
the tur ned up section) must f ace the inside of
the mo w er ( Figur e 6 ).
1. Adjust the blades b y using the 4 spacers
(1/4 inc h) spacers on the blade spindle bolts;
refer to the Operator’ s Man ual.
2. Install the new blades to the spindles with
w ashers and blade bolts that w ere previously
remo v ed ( Figure 6 ).
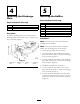
3. Tighten the blade bolt to 75-80 ft-lb (101-108
N∙m).
4. R otate the blades and ensure there is clearance
betw een the blades and the baffles .
5. Tighten all bolts and n uts ( Figure 4 and Figure
5 ).
A blade is shar p . Contact with shar p blade
can cause serious per sonal injur y .
W ear g lo v es or wrap shar p edges of the
blade with a ra g .
Figure 6
1. Blade
4. Spacer
2. Blade bolt 5. Thin washer
3. Curved washer
6. Nut
Operation
Selecting the Proper
Height-of-Cut
R emo v e appro ximately one inc h or no more
than 1/3 of the g rass blade when cutting . In
ex ce ptionally lush and dense g rass y ou ma y need
to raise the height-of-cut setting or con v er t to side
disc harg e or bag ging operations .
Mowing in Extreme
Conditions
Air is required to cut and recut g rass clippings in
the mo w er housing, so do not set the height-of-cut
too lo w or totally sur round the housing b y uncut
g rass . Alw a ys tr y to ha v e one side of the mo w er
6