
Installation Instructions


1
All Rights Reserved
Printed in the USA
W 2007, 2009 by The Toro Company
8111 Lyndale Avenue South
Bloomington, MN 55420-1196
Light Kit
Greensmaster
)
1000, 1600, Flex 18 & Flex 21
Model No. 04057
Model No. 110–3463
Form No. 3358–741 Rev. B
Installation Instructions
Before servicing or making adjustments to the
machine, stop engine and remove the wire from
the spark plug.
Caution
1. Mount a light to each side of handle as follows:
For Greensmaster Flex 18
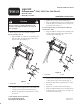
• Align the inner set of light bracket mounting holes
with the handle. The light bracket should extend
outward from the handle (Fig. 1).
1
2
Figure 1
1. Light bracket 2. Light
• Loosely secure the light bracket to the handle with
a clamp and two nylon insert locknuts (Fig. 1).
• Position the light bracket approximately 6” below
the console.
• Tighten the two nylon insert locknuts (Fig. 1).
• Using the outer mounting hole in the light bracket,
mount the light to the bracket with a carriage bolt,
lock washer and nut (Fig. 1).
For Greensmaster Flex 21, Greensmaster 1000 and
Greensmaster 1600
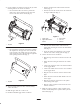
• Align the outer set of light bracket mounting holes
with the handle. The light bracket should extend
inward from the handle (Fig. 2).
1
2
Figure 2
1. Light bracket 2. Light
• Loosely secure the light bracket to the handle with
a clamp and two nylon insert locknuts (Fig. 2).
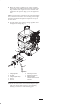
• Position the light bracket approximately 6” below
the console.
• Tighten the two nylon insert locknuts (Fig. 2).
• Using the outer mounting hole in the light bracket,
mount the light to the bracket with a carriage bolt,
lock washer and nut (Fig. 2).