
Installation Instructions


Step
3
Replacing the Upper Deck
Belt
Parts needed for this step:
1
Belt
Procedure
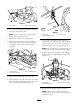
Note: R efer to Figure 4 for this procedure .
1. Use a 3/8-inc h soc k et and ratc het to remo v e
the 3 screws that secure the left belt co v er
from the cutting dec k.
2. Use a 5/8-inc h soc k et and ratc het and a
5/8-inc h bo x/open end wrenc h to loosen
(not remo v e) both the upper belt (engine to
dec k belt) and the idler pulleys on their idler
brac k ets .
Note: T his will pro vide sufficient belt guide
clearance to remo v e the belt from the pulleys .
3. R emo v e and discard the damag ed upper dec k
belt.
4. Install the new belt around the upper pulley of
the left spindle and route around the 2 upper
belt idler pulleys .
Note: Ensure that the belt is routed betw een
the 2 belt k ee pers and the pulleys on both idler
brac k ets .
5. Tighten both idler pulleys mounting hardw are .
6. Install the left belt co v er .
7. Set the dec k aside .
Step
4
Removing the Lower PTO
Lever
No Parts Required
Procedure
1. Lift the engine hood.
2. Drain the fuel tank or remo v e the fuel cap
from the tank, place a piece of thin plastic film
o v er the mouth of the tank, and re place the
fuel cap securely .
3. R emo v e the fuel tank mounting hardw are
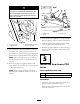
( Figure 5 ).
Figure 5
1. Fuel tank
3. Screws
2. Fuel tank brackets
4. Car efull y lift the tank up and out to pro vide
access to the bolt and n ut connection of the
stop eng ag ement brac k et and the upper and
lo w er PTO lev ers ( Figure 6 ).
3