
Installation Instructions

1
All Rights Reserved
Printed in the USA
W 2006 by The Toro Company
8111 Lyndale Avenue South
Bloomington, MN 55420-1196
Roll–Over Protection System
Reelmaster 6500–D & 6700–D
Part No. 112–6505
Form No. 3356–252 Rev A
Installation Instructions
Install the Seat Belt
1. Install each end of the seat belt to the holes in the back
of the seat with a capscrew and lockwasher. The
retractor side of the belt is to be mounted to the left
side of the seat. Tighten the capscrews securely.
1
Figure 1
1. Seat belt
Install the ROPS Frame
1. Unlatch and open the hood.
2. Remove and discard the pump cover (Fig. 2).
1
Figure 2
1. Pump cover
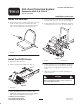
3. Lower the ROPS frame over the machine while
aligning the mounting holes with the frame mounting
holes. Position the ROPS as shown in figure 3.
4. Loosely mount the outside plate of each ROPS leg to
the frame with (4) 1/2 x 1–1/4” lg. capscrews (Fig. 3).
5. Loosely mount the front of each ROPS leg angle plate
to the frame with a 1/2 x 1–1/4” lg. capscrew (Fig. 3).
1
2
Figure 3
1. ROPS 2. Pump cover
6. Loosely mount the rear of each ROPS leg angle plate
to the frame with a 1/2 x 6” lg. capscrew and flange
head nut (Fig. 3). Torque all the capscrews to 75-85
ft–lbs.
7. Affix the new pump cover to frame, positioning as
shown in figure 3.
Danger
When operating the machine, always use the seat
belt and the ROPS together.