
Installation Instructions

1
All Rights Reserved
Printed in the USA
W 2007 by The Toro Company
8111 Lyndale Avenue South
Bloomington, MN 55420-1196
Rear Roller Scraper Kit with Roller
Greensmaster Flext 18 and Flext 21
Rear Roller Scraper Kit
Riding Greensmaster DPA Cutting Reels
Part No. 112–9351
Part No. 112–9352
Part No. 112–9353
Form No. 3358–213 Rev. A
Installation Instructions
1. Place the cutting unit on a level surface.
2. Remove the (2) capscrews and nuts securing the roller
clamps to each end of the cutting unit (Fig. 1).
Remove the roller.
Note: On the Flex 18 and Flex 21, replace the roller with
the roller/scraper assembly included in the kit. Use the
following instructions to verify that the scraper is
properly adjusted.
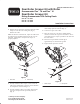
1
2
Figure 1
1. Rear roller 2. Roller clamp
3. Loosely install the roller scraper to each end of the
roller with a clamp block, capscrew and nut. Position
the components as shown in figure 2.
4. Loosely install the roller to the cutting unit with the
capscrews, clamps and nuts previously removed
(Fig. 2).
5. Center the roller on the cutting unit and tighten the
roller clamp capscrews and nuts (Fig. 2).
6. Center the scraper on the roller.
7. Move the scraper in or out in the clamps until the
clearance between the scraper bar and roller is .015 to
.030. Make sure the scraper is parallel to the roller and
the level surface.
8. Rotate the scraper until the bottom edge is
approximately 1/4 inch from the ground.
9. Tighten all the capscrews and nuts.
1
2
Figure 2
1. Roller scraper 2. Clamp block