
Installation Instructions

FormNo.3360-876RevA
RearRollerScraperKit
2010andAfter27inand32inDPACuttingReelforReelmaster
3100-DTractionUnit
ModelNo.114-9368
ModelNo.114-9369
InstallationInstructions
Note:Determinetheleftandrightsidesofthemachinefromthenormaloperatingposition.
Installation
1
InstallingtheScraperKit
Partsneededforthisprocedure:
1Righthandscraperbracket
1
Scraperrod
1
Lefthandscraperbracket
4
Flangenut(3/8inch)
4
Flangenut(5/16inch)
Procedure
1.Placethemoweronalevelsurface.
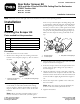
2.Removethe2angelocknutssecuringeachroller
brackettothesideplates(Figure1).Donotremove
thebolts.
Figure1
1.Removenutssecuring
eachendofroller
2.Sideplatemountingange
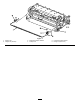
3.Mounttheappropriatescraperbracket(righthand
orlefthand)toeachrollerbracketwith2ange
nuts(5/16inch).Positionthebracketsasshownin
Figure3.Makesuretherollerissecureintheroller
brackets.
Note:Whenoperatinginhigherheightsofcut,it
maybenecessarytoremovethe1/4inchspacer
fromontopofthesideplatemountingangeand
torepositionitunderthesideplatemountingange.
Whenoperatinginlowerheightsofcut,itmaybe
necessarytoremovethe1/4inchspacerfromunder
thesideplatemountingangeandtorepositionit
ontopofthesideplatemountingange(
Figure2).
Makesurethescraperisalwayspositionedonthe
top.
Figure2
1.Scraperbracket3.Sideplatemountingange
2.1/4inchspacer
4.Threadaangenut(3/8inch)ontoeachendofthe
scraperrodasshowninFigure3.
5.Insertthescraperrodintothescraperbracketsand
looselysecureitwith2angenuts(3/8inch)as
showninFigure3.
6.Adjustthelocknutstoattaina.030inch-.060inch
clearancebetweenthescraperbarandtheroller.The
distancebetweenthebottomofthebarandthelevel
surfaceshouldbeslightlyhigherthantheheightof
cut.
7.Ensurethescraperbarisparalleltotherollerand
thelevelsurface.
Note:Whenthescraperisproperlyinstalled,the
bottomofthebarshouldjustbrushtheturf.
8.Tightenallfasteners.
©2009—TheToro®Company
8111LyndaleAvenueSouth
Bloomington,MN55420
Registeratwww.Toro.com.
OriginalInstructions(EN)
PrintedintheUSA.
AllRightsReserved