
Installation Instructions


1
RemovingtheExistingWater
Separator
NoPartsRequired
Procedure
Important:Allowtheenginetocoolbefore
installingthiskit.
1.Drivethemachinetoawellventilatedareaaway
fromanopenameorwherefuelfumesmaybe
ignitedbyaspark.
2.Disengagethepowertakeoff(PTO)andsetthe
parkingbrake.
3.Turnofftheengine,removethekey,andwaitforall
movingpartstostopbeforeleavingtheoperating
position.
4.Disconnectthenegativebatterycablefromthe
battery.
5.Allowtheenginetocoolbeforeinstallingthiskit.
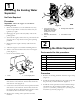
6.Tilttheseatforwardandremovethefrontengine
panel(Figure1).
7.Closethefuelselectorvalve.
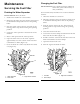
Figure1
1.Knob2.Frontenginepanel
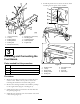
8.Locatethehosebetweenthewaterseparatorandthe
fuelselectorvalve.Removethefuelhosefromthe
fuelselectorvalve(Figure2).
9.Locatethehosebetweenthewaterseparatorandthe
fuelselectorvalve.Removethefuelhosefromthe
theengine(Figure2).Rememberthelocationwhere
thefuelhosewasconnectedtotheengine.
10.Removetheexistingwaterseparatorfromthe
machine.
Figure2
1.Fuelhosefromthe
separatortotheengine
(makenotewherethe
connectionisonthe
engine)
3.Existingwaterseparator
2.Hosefromfuelselector
valve
4.Fuelselectorvalve
2
InstallingtheWaterSeparator
Partsneededforthisprocedure:
1Mountingplate
1
Locknut(1/4inch)
1
Fuellterclamp
1
Bolt(5/16x1-3/4inches)
1
Bolt(5/16x3/4inch)
2
Locknut(5/16inch)
1Waterseparator
Procedure
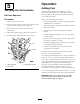
1.Removetheexistinghardwarefromtheenginestrap
(Figure3).
2.Installthemountingbrackettotheenginestrapwith
thepreviouslyremovedhardware(Figure3).
3.Installthewaterseparatorintothefuellterclamp
andinstallittothemountingbracketwithabolt
(5/16x1-3/4inches),abolt(5/16x3/4inch),and
2locknuts(5/16inch)(Figure3).
2