Installation Instructions
Manuals
Brands
Toro Manuals
Lawn Tractors
Toro 117-0054
1
2
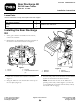
Figure
3
1.
T
ab
2.
Safety
switch
2
1
2