
Installation Instructions

CheckingtheHydraulic
Fittings
1.Checkthelevelofthehydraulicuidinthe
transmission;refertotheOperator’sManualforyour
machine.
Note:Addthespeciedhydraulicoilasneeded.
2.Startthemachineandcheckforleaks.
Note:Repairanyleakinghosesorttings.
3.Shutoffthemachineandremovethekeyfromthe
ignitionswitch.
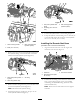
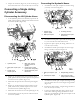
4.Disconnecttheremote-oathoseandthehosefor
thesingleactingcylinderfromthehydraulicpanel
couplings(Figure18).
5.Installthedustcapsontotheendoftheremote-oat
hoseandthesingleactingcylinderhose.
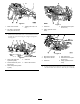
6.Connectthepressureandreturnhosesforthelift
cylinderstothehydraulicpanelcouplings(Figure16).
7.Startthemachineandraisethebeduntilyoucan
removethesafetysupport.
8.Removethesafetysupport,lowerthebedofthe
machine,shutofftheengine,andremovethekey.
Operation
UsingtheHydraulicFloatKit
foraSingleActingCylinder
1.Movethemachinetoalevelsurfaceandsettheparking
brake,shutofftheengineandremovethekey.
2.Disconnecttheliftcylinderhoses;referto
DisconnectingtheLiftCylinderHoses.
3.Connecttheremote-oathoseandthesingleacting
cylinderhose;refertoConnectingtheHydraulicHoses.
4.Selecttheneutralpositionformachineswithmanual
transmissionsorparkformachineswithautomatic
transmissions.
5.Starttheengine.
6.Controlthesingleactingcylinderasfollows:
•Extendthesingleactingcylinder
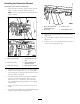
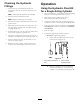
A.Ensurethatthehydraulicliftlockisinthe
Unlockposition(Figure19).
Figure19
1.Lockposition(hydraulic-lift
lock)
2.Unlockposition
(hydraulic-liftlock)
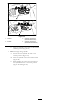
B.Movethecylindercontrolleverbackward
untiltheattachmentforthesingleacting
cylinderisatthedesiredposition(Figure20).
7