
Installation Instructions


7.Installthefastenersintothesameholesinthedeck
theywereoriginallyremovedfrom.Thisensureno
holesareleftopenwhenthedeckisoperated.
Openholesinthemowerexposeyouandothers
tothrowndebris.Debristhrownoutofholesin
themowercancauseinjury.
•Neveroperatethemowerwithouthardware
mountedinallholesinthemower.
•Installhardwareinmountingholeswhen
thebafeisremoved.
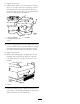
8.Removetheforwardsetofcarriageboltsand
locknutssecuringthefrontendofthedischargeplate
tothemowerdeck(Figure2).Removetheforward
boltandlocknutcoveringtheholeinthedeckjust
forwardofthedischargeplate.Retainthefasteners
forfutureuse.
Figure2
1.Locknuts,frontof
dischargeplate
3.Locknut,forwardholein
deck
2.Carriagebolts,frontof
dischargeplate
4.Hexheadbolt,forward
holeindeck
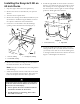
9.Installtherightbafetomowerdeckasshownin
Figure3.Usetwolocknuts(5/16inch)tosecure
theweldedpostsoftherightbafetothetopofthe
mowerdeckatcenterandrightofcenterpositions.
Handtightenthefasteners.
G010704
1
2
3
Figure3
1.Locknut(5/16inch)3.Weldedposts,rightbafe
2.Rightbafe
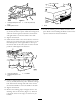
10.Locatethebafeguardinlooseparts.Usethethree
setsoffastenersremovedfromthedischargeplate
andforwardholetosecurethebafeguardandthe
rightbafetothemowerdeckasshowninFigure4.
Handtightenthefasteners.
G010712
1
2
4
3
5
6
7
Figure4
1.Carriagebolt(5/16x3/4
inch)
5.Hexheadbolt,existing
(forwardholeindeck)
2.Locknuts,existing(front
ofdischargeplate)
6.Carriagebolts,existing
(frontofdischargeplate)
3.Locknut,existing(forward
holeindeck)
7.Locknut(5/16inch)
4.Bafeguard,54inch
decks
11.Locateacarriagebolt(5/16x3/4inch)andlocknut
(5/16inch)fromlooseparts.Installthecarriagebolt
andlocknutthroughrearwallofthemowerdeck
andrightbafetosecurethebafetothedeck.
2