
Installation Instructions

FormNo.3362-309RevA
60AmpAlternatorKit
forKubota05Series-PoweredTractionUnits
ModelNo.117–5540
InstallationInstructions
LooseParts
Usethechartbelowtoverifythatallpartshavebeenshipped.
Description
Qty.
Use
Nopartsrequired
–
Removetheexistingalternator
60Ampalternatorassembly1
Tensioningbracket1
Installationinstructions1
Partscatalog1
Installthenewalternator
RemovingtheExisting
Alternator
Important:Retainallfastenersforusewhen
installingthenewalternator.
1.Disconnectthenegative(black)batterycablefrom
thebattery.
2.Removethenut,washer,andpowercablefromthe
studonthealternator.
3.Loosenthealternatormountingboltandnut
(Figure1).Also,loosenthetensioningbracket
adjustingbolt.
G010690
1
2
6
3
4
5
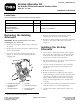
Figure1
1.Alternatormountingbolt4.Alternator
2.Tensioningbracket
adjustingbolt
5.Alternatormountingnut
3.Tensioningbracket6.Tensioningbracket
mountingbolts
4.Removethebeltfromthepulleys.
5.Removethealternatorandtensioningbracket
adjustingboltandremovethealternator.
6.Removetheboltssecuringtheendofthetensioning
brackettotheengineandremovethebracket
(Figure1).
Installingthe60Amp
Alternator
1.Securethenewtensioningbrackettotheenginein
thelocationtheoldbracketwasinstalledusingthe
boltspreviouslyremoved(Figure1).Torquethe
boltsto29to33ft-lb(39.5to44N-m).
2.Mountthealternatortotheenginewiththeboltand
nutpreviouslyremoved(Figure1).
3.Looselyconnectthealternatortothetensioning
bracketusingthefastenersremovedpreviously
(Figure1).
4.Routethebeltaroundthepulleys.
5.Rotatethealternatortotightenthebelt.Proper
tensionwillallow3/8inch(10mm)deectionwhen
10lb(4.5kg)isappliedonthebeltbetweenthe
pulleys.Whentheproperbelttensionisattained,
torquethemountingboltsto47to53ft-lb(64to
71N-m).
6.Connectthepowercabletothestudonthealternator
usingthefastenersyouremovedpreviously.
7.Connectthenegative(black)batterycabletothe
battery.
©2009—TheToro®Company
8111LyndaleAvenueSouth
Bloomington,MN55420
Registeratwww.Toro.com.
OriginalInstructions(EN)
PrintedintheUSA.
AllRightsReserved