
Installation Instructions


InstallingtheRecycler®Kit
1.Stoptheengineandremovetheignitionkey.
2.RemovethemowerasdescribedinyourOperator’s
Manual.
3.Turnthemowerupsidedown.
4.Removetheexistingmowerbladesinstalledonyour
deck.RefertotheRemovingtheBladessectionin
theOperator’sManualformoreinformation.
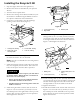
5.Locatethecutoffbafeatthesidedischarge
openingonthemowerdeck(Figure1).
G012800
1
2
3
4
Figure1
1.Carriagebolt,existing3.Cutoffbafe,existing
2.Rearholesinthe
dischargeplate
4.Locknut,existing
6.Removethefastenerssecuringthecutoffbafeto
thedeckandremovethecutoffbafe.
Note:Savethecutoffbafeforconvertingbackto
sidedischarge.
7.Installthefastenersintothesameholesinthedeck
theywereoriginallyremovedfrom.Thisensureno
holesareleftopenwhenthedeckisoperated.
DANGER
Openholesinthemowerexposeyouandothers
tothrowndebris.Debristhrownoutofholesin
themowercancauseinjury.
•Neveroperatethemowerwithouthardware
mountedinallholesinthemower.
•Installhardwareinmountingholeswhenthe
bafeisremoved.
8.Installtherightbafetomowerdeckasshownin
Figure2.Usetwolocknuts(5/16inch)tosecure
theweldedpostsoftherightbafetothetopofthe
mowerdeckatcenterandrightofcenterpositions.
Handtightenthefasteners.
1
2
3
G012805
Figure2
1.Locknut(5/16inch)
3.Weldedposts
2.Rightbafe
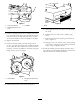
9.Locatethebafeguardinlooseparts.Usetwo
carriagebolts(5/16x3/4inch)andtwolocknuts
(5/16inch)tothedecktosecurethebafeguard
totherightbafeandthemowerdeckasshownin
Figure3.Handtightenthefasteners.
G012806
1
2
3
4
3
2
Figure3
1.Bafeguard3.Carriagebolts(5/16x3/4
inch)
2.Locknut(5/16inch)4.Rightbafe
10.Locateacarriagebolt(5/16x3/4inch)andlocknut
(5/16inch)fromlooseparts.Installthecarriagebolt
andlocknutthroughrearwallofthemowerdeck
andrightbafetosecurethebafetothedeck.
11.Tightenallfasteners.
12.Installtheleftbafetothemowerdeckasshownin
Figure4.Usetwolocknuts(5/16inch)tosecure
theweldedpostsoftheleftbafetothetopofthe
mowerdeckatthecenterandleftpositions.Hand
tightenthefasteners.
2