
Installation Instructions

1
1
2
3
G012841
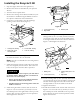
Figure4
1.Locknut(5/16inch)3.Leftbafe
2.Carriagebolt(5/16x3/4
inch)
13.Locateacarriagebolt(5/16x3/4inch)andalock
nut(5/16inch)fromlooseparts.Installthecarriage
boltandlocknutthroughsidewallofthemower
deckandleftbafetosecurethebafetothedeck.
14.Tightenallfasteners.
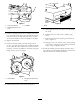
15.Locatethekickerbafesandfourangescrews
(5/16x3/4inch)fromlooseparts.Installthebafes
totheundersideofthedeckatthelocationsshown
in
Figure5.Securethebafestothedeckusingfour
angescrews(5/16x3/4inch).
G012843
1
2
Figure5
1.Kickerbafes2.Flangescrew(5/16x3/4
inch)
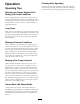
16.InstallthedecaltotheareashowninFigure6.
Figure6
1.Decal
A.Thoroughlycleantheareawhereyouwillinstall
thedecal.
B.Dampentheareawithwaterormildlysoapy
water.
C.Peelthedecalfromthebackingandinstallitin
place.(
Figure6).
D.Squeegeeacrossthesurfaceofthedecal,starting
atthecenterofthedecalandworkingtowardthe
edges,usingoverlappingstrokes.
17.Installthemulchingmowerbladeslocatedinloose
parts.RefertotheInstallingtheBladessectioninthe
Operator’sManualformoreinformation.
3