Form No. 3366-705 Rev B Turf Groomer Sand Pro® Traction Unit with QAS Model No. 08794—Serial No. 311000001 and Up Model No. 119–2827 Model No. 119–7107 Model No. 119–7108 Model No. 119–7109 To register your product or download an Operator's Manual or Parts Catalog at no charge, go to www.Toro.com.
Contents Introduction Introduction................................................................. 2 Safety ........................................................................... 3 Before Operating ................................................. 3 While Operating................................................... 3 Maintenance......................................................... 3 Safety and Instructional Decals ............................. 4 Setup.............................................
Safety • Using the machine demands attention. To prevent loss of control: – Operate only in daylight or when there is good artificial light. – Drive slowly and watch for holes or other hidden hazards. – Use extreme caution when driving into a sand trap, ditch, creek, or other hazard. – Reduce your speed when making sharp turns and when turning on hillsides. – Avoid sudden starts and stops. – Before backing up, look to the rear and ensure that no one is behind the machine.
• Make sure that all hydraulic line connectors are tight and all hydraulic hoses and lines are in good condition before applying pressure to the system. and other parts of the body away from the fan and other moving parts. • Do not overspeed the engine by changing the governor settings. To be sure of safety and accuracy, have an Authorized Toro Distributor check the maximum engine speed with a tachometer.
Setup Loose Parts Use the chart below to verify that all parts have been shipped. Description Use Qty. Turf groomer assembly 1 Greens brushes Bolt, 5/16 x 1-1/2 inch Washer Synthetic turf brush Flange bolt, 5/16 x .
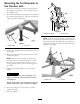
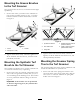
Mounting the Turf Groomer to the Traction Unit 1. Remove the fasteners securing the turf groomer to the shipping crate. Remove the turf groomer from the shipping crate. 2. Remove the quick pins securing the storage stands in the raised position (Figure 2). Pivot the stands down and secure with the quick pins. Figure 3 1. Attachment adapter Note: To rotate the Turf Groomer upward, loosen the lockout lever, pivot the Turf Groomer upward to the desired position and tighten the lever (Figure 4).
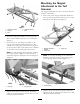
Mounting the Greens Brushes to the Turf Groomer The greens brushes are for use on natural turf after light topdressing. 1. Secure each of the (7) brushes to the underside of turf groomer assembly with (4) 5/16 x 1-1/2 inch bolts and washers. Position the brushes as shown in Figure 5. 4 5 g014337 Figure 6 1. Synthetic Turf Brush 2. Hex Head Screw Figure 5 1. Brush 2. Bolt (5/16 x 1-1/21) 3. Washer 4. Outside of support channel (solid lines shown) 5. Inside of support channel (dashed lines shown) 3.
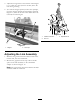
Mounting the Magnet Attachment to the Turf Groomer The magnet attachment is to be to used only with the synthetic turf brushes. 1. Secure each of the magnet attachment brackets to the top of the turf groomer with (2) 5/16 x 1 inch flange bolts and flange nuts (Figure 9). Figure 7 1. Spring tine holder 2. Flag pin 3. Bolt 4. Retainer bracket 5. Bolt 2. Secure the spring tine holder to the turf groomer with a retainer bracket and (2) 5/16 x 1 inch bolts (Figure 7). 3.
3. Adjust the turf groomer so the bottom of the magnet is a 1/4 inch to 1 inch (6 mm to 25 mm) above the turf when grooming. 4. To rotate the magnet upward, remove the quick pin, pivot the magnet upward and reinstall the quick pin (Figure 11). This can be done when debris has to be removed from the magnet. Figure 12 1. 0.060 to 0.080 inch 2. Jam nut Figure 11 1. Magnet 2. Quick pin Adjusting the Link Assembly 1. With the turf groomer mounted and secured on the traction unit, raise the attachment. 2.
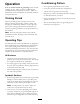
Conditioning Pattern Operation • Never groom perpendicular to the seams. Read this entire section on grooming before actually working on turf. There are many conditions that will determine the adjustments necessary. Make the adjustments on the attachments for optimum results in your particular area. • Lower the groomer and travel in straight lines. • Always raise the groomer when turning. • Drag the groomer in alternating directions keeping in mind the direction of seams.
Figure 13 Inspecting and Cleaning the Turf Groomer, Attachments and Traction Unit 1 When the grooming operation is completed, clean the machine thoroughly with water to remove debris from the attachments. Note: If the attachment adapter becomes stuck to the traction unit adapter, insert a pry bar/screwdriver into the pry slot to disengage the parts (Figure 14). G003783 Figure 14 1.
Maintenance Maintaining the Brushes Lubrication Rotating the Brushes Greasing the Bushings The brushes can be rotated for increased life. If a set occurs on the bristles, rotate the brushes. If you operate the Turf Groomer under normal conditions, lubricate all grease fittings for the bearings and bushings after every 50 hours of operation with No. 2 General Purpose Lithium Base Grease. Lubricate bearings and bushings immediately after every washing, regardless of the interval listed.
Notes: 13
Notes: 14
Notes: 15
The Toro Total Coverage Guarantee A Limited Warranty Conditions and Products Covered The Toro® Company and its affiliate, Toro Warranty Company, pursuant to an agreement between them, jointly warrant your Toro Commercial product (“Product”) to be free from defects in materials or workmanship for two years or 1500 operational hours*, whichever occurs first. This warranty is applicable to all products with the exception of Aerators (refer to separate warranty statements for these products).