Form No. 3366-999 Rev B Battery Kit Workman® MD/MDX Utility Vehicle Model No. 119-9680 Installation Instructions Loose Parts Use the chart below to verify that all parts have been shipped. Procedure 1 2 3 4 © 2011—The Toro® Company 8111 Lyndale Avenue South Bloomington, MN 55420 Description Qty. Use Battery 1 Charge the battery. Quick attach terminal connectors 2 Assemble the battery. No parts required – Remove the old battery.
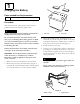
1 1 Charging the Battery Parts needed for this procedure: 1 Battery Procedure Bulk electrolyte with 1.265 specific gravity must be purchased from a local battery supply outlet. G015344 DANGER Figure 1 Battery electrolyte contains sulfuric acid which is a deadly poison and causes severe burns. 2. Vent caps 1. Cell vents Do not drink electrolyte and avoid contact with skin, eyes or clothing. Wear safety glasses to shield your eyes and rubber gloves to protect your hands. 3.
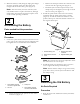
6. When the battery is fully charged, unplug the charger from the electrical outlet, then disconnect the charger leads from the battery posts (Figure 2). • Remove the clamp arm from the connector and reinsert from the opposing side (Figure 3). • Install the jam nut removed previously to the clamp arm post and tighten just enough to retain the nut on the post (Figure 3).
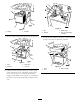
2 2. On the right side of the machine, locate the battery. Remove the cover. 3. Disconnect the battery cables from the battery. Refer to the Operator’s Manual for more information. 4. Remove the fasteners securing the battery and bracket assembly to the machine frame (Figure 5). 1 2 1 3 G015040 Figure 6 1. Carriage bolt 2. Lock nut 3 2. Install the battery assembly to the bracket. G015039 Figure 5 1. Bolt 3. Battery assembly and bracket 2.
1 2 3 4 1 G015696 G015699 2 Figure 9 Figure 7 1. Battery 1. Nut 2. Washer 2. Bracket 3. Battery lead 4. Post on quick attach connector 3. Secure it with a hold down block, bolt and locknut. 5. Install the cover. Make sure the tabs in the cover are seated in the slots on the battery bracket. 1 2 1 2 3 4 3 G015697 Figure 8 1. Bolt 2. Bracket 3. Hold down 4. Lock nut G015698 Figure 10 1. Cover 2. Tab 4. Install the battery leads to the posts on the quick attach connectors.
Notes: 6
Notes: 7