
Installation Instructions
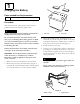


6.Whenthebatteryisfullycharged,unplugthecharger
fromtheelectricaloutlet,thendisconnectthe
chargerleadsfromthebatteryposts(Figure2).
Note:Afterthebatteryhasbeenactivated,add
onlydistilledwatertoreplacenormalloss,although
maintenance-freebatteriesshouldnotrequirewater
undernormaloperatingconditions.
2
AssemblingtheBattery
Partsneededforthisprocedure:
2
Quickattachterminalconnectors
Procedure
1.Locatethequickattachterminalconnectorsinloose
parts.Oneoftheconnectorsmustbeadjustedfrom
itsoriginalstatetoaccommodatetheinstallation.
G015695
1
2
3
4
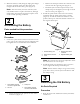
Figure3
1.Quickattachterminal
connector,originalstate
3.Clamparm
2.Jamnut
4.Quickattachterminal
connector,alteredstate
•Loosenandremovethejamnutononeofthe
connectors(Figure3).
•Removetheclamparmfromtheconnectorand
reinsertfromtheopposingside(Figure3).
•Installthejamnutremovedpreviouslytothe
clamparmpostandtightenjustenoughtoretain
thenutonthepost(
Figure3).
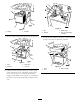
2.Installthequickattachconnectorstothebattery
terminalswiththeclamparmsfacingoutward
(Figure4).Installtheunalteredconnectortothe
positivebatterpost.Instalthealteredconnectorto
thenegativebatterpost.
G015700
1
2
3
4
5
Figure4
1.Positivebatterypost4.Alteredquickattach
connector
2.Quickattachconnector
5.Negativebatterypost
3.Lever
Note:Thejamnutmayneedtobeadjustedtoallow
theconnectortotoverthepost.
3.Installtheclampoverthebatterypost.Closethe
levertotightentheclamparoundthepost.
Note:Ensurethattheclampissnugonthebattery
post.Ifitisloose,turnthejamnutclockwiseuntil
theclampissnug.
3
RemovingtheOldBattery
NoPartsRequired
Procedure
1.Raisethebedofthemachinethebatterykitwillbe
installedon.
3