
Installation Instructions

FormNo.3370-245RevA
CuttingUnitAlignmentKit
Model3036872inSideDischargeMower
ModelNo.120-6599
InstallationInstructions
Installation
1.Positionthemachineonalevel,hardsurface,lower
themowingdecktotheground,settheparking
brakeandremovethekeyfromtheignitionswitch.
2.Removethedeckbeltcoversandrelievethedeckbelt
tensionbyremovingthebeltfromtheidlerpulleys.
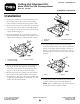
3.Loosenthe(4)screwsthatsecurethegearboxtothe
supportbrackets(
Figure1).
4.Removeanddiscardthe(2)screwsthatsecurethe
rightside(dischargechuteside)ofthegearboxtothe
supportbracket(Figure1).Retainthelockwashers.
Figure1
1.Screw,2(discard)3.Screw,2(retain)
2.Lockwasher(retain)
5.Removeandretainthe(2)screwsandlockwashers
thatsecuretheleftside(oppositethedischarge
chuteside)ofthegearboxtothesupportbracket
(Figure1).Retainthescrewsandlockwashers.
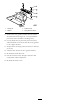
6.Removeandretainthe(2)angenutsandwashers
thatsecuretheleftgearboxbrackettothemower
deck(
Figure2).Thisisthesideofthegearboxthat
isoppositethedischargechute.Retainthenutsand
washersbutdiscardthebracket.
Figure2
1.Flangenut
3.Leftgearboxbracket
2.Washers
7.Looselyinstallthe(2)newscrews,previously
removedwashersand(2)newspacers(includedin
thekit)totherightsupportbracketasshownin
Figure3.Thescrewsmustbeleftloosetoallow
thealignmentofthescrewsontheothersideofthe
gearbox.
Figure3
1.Screw2.Spacer
8.Installthe(2)rubbermountsintotheholesinthe
bottomofthenewgearboxbracket(Figure4).
Note:Waterorliquidsoapcanbeusedtoassistin
seatingthemountsingearboxbracket.
©2011—TheToro®Company
8111LyndaleAvenueSouth
Bloomington,MN55420
Registeratwww.Toro.com.
OriginalInstructions(EN)
PrintedintheUSA.
AllRightsReserved