
Installation Instructions
FormNo.3433-442RevA
WireHarnessforWirelessHourMeterKit
Walk-BehindGreensmaster
®
Mower
ModelNo.120-9690
InstallationInstructions
Installation
PreparingtheMachine
1.Parkthemachineonalevelsurface.
2.Engagetheparkingbrake.
3.Shutofftheengine.
4.Removethespark-plugwirefromthesparkplug.
InstallingtheWireHarness
1.Unplugthemachinewireharnessfromthe
interlockmoduleandremovethemodulefrom
thebracket.
Retainthehardware.
2.Unplugthepowerconnectionsfromthebackof
theengine.
3.Removethe2nutsthatsecurethefueltankto
theengine.
4.Removetheexistingbracket.
5.Installthenewbracket(Figure1)withthe2nuts
thatyoupreviouslyremoved.
6.Installtheinterlockmoduletothenewbracket
(Figure1).
7.Installthevoltageregulatortothenewbracket
(Figure1).
8.Iftheunitisequippedwithalightkit,disconnect
thelightpowerharnessfromtheengine.
9.Installthewireharnessasfollows:
•Connectthewireless-hour-meterconnector
tothewirelesshourmeter.
•Connectthevoltage-regulatorconnectorto
thevoltageregulator.
•Useanexistingenginemountingboltto
connecttheringterminaltotheengineas
aground.
•Connectthewireless-hour-meterwire
harnesstothemachineandenginewire
harnessesperthefollowingtable:
WHMWire
Harness
YellowBlue
BlackBlack
MachineWire
Harness
YellowDarkBlue
BlackLightBlue
EngineWire
Harness
10.Usecabletiestosecurethewireharnesstothe
handleandoutofthewayofhotorsharpparts.
Note:Ifyourmachineisequippedwithan
hourmeter,thewirelesshourmetershould
beputinitsplace.Donotdisconnecttheold
hourmeter;secureitundertheconsoleshroud
instead.Ifyourmachineisnotequippedwithan
hourmeter,thewirelesshourmetershouldbe
securedundertheconsoleshroud.
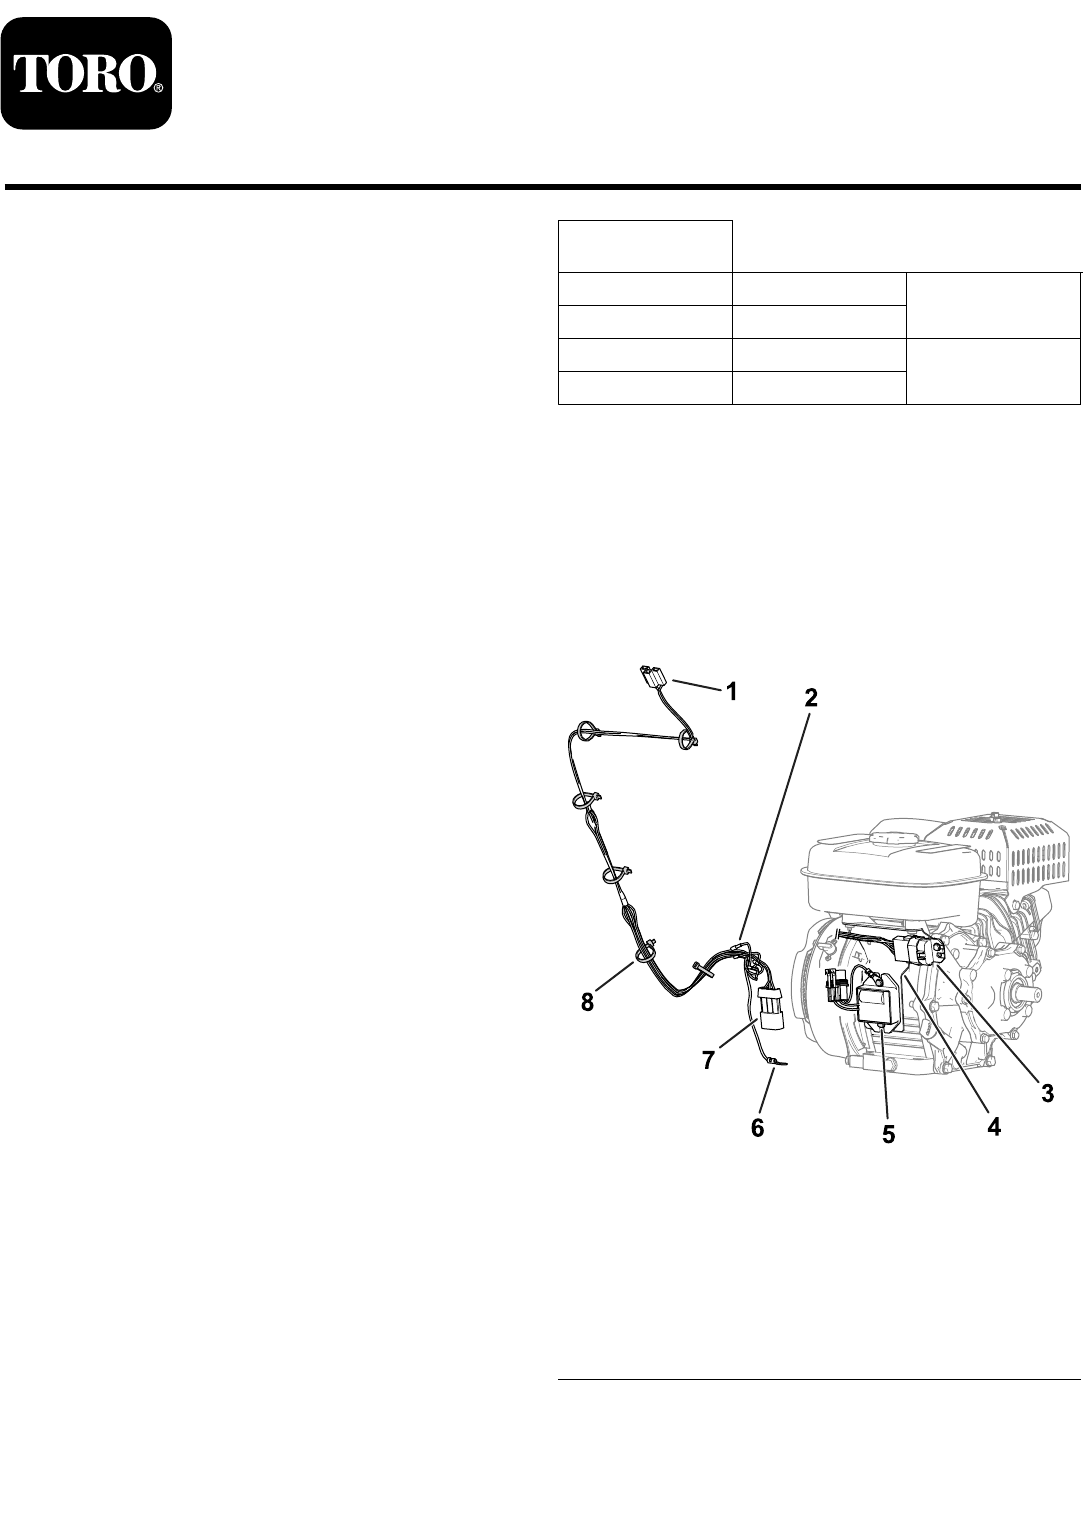
g292614
Figure1
1.Connector—wirelesshour
meter
5.Voltageregulator
2.Engine/machine
connectors
6.Ringterminal(engine
ground)
3.Interlockmodule
7.Connector—voltage
regulator
4.Bracket
8.Cabletie
©2019—TheToro®Company
8111LyndaleAvenueSouth
Bloomington,MN55420
Registeratwww.Toro.com.
OriginalInstructions(EN)
PrintedintheUSA.
AllRightsReserved
*3433-442*A