
Installation Instructions

FormNo.3372-683RevA
ScraperBrushKit
FullRollerforGreensmaster
®
800Walk-BehindMower
ModelNo.121-2616
InstallationInstructions
1.Placemoweronalevelsurface.Removethegrass
basketifinstalled.
2.AttheHeight-of-Cut(HOC)arms,loosenthejamnuts
andtherollermountingscrewswhichsecuretheroller
axletotheHOCarms.
3.Rotateeachrolleraxlesothatthecross-shafthole
(Figure1)islevel.Atoneendoftheroller,lightly
tightentherollermountingscrew .
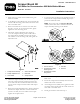
4.Threadthescraperadjustment-nuts(Figure1)
ontothescrapermountingstudsateachendof
thescraper/brushassembly.Positionthescraper
lock-washersonthemountingstuds,andagainstthe
adjustmentnuts.
5
G018172
1
2
3
4
6
Figure1
1.Scraper/brushassembly4.Axlecross-shafthole
2.Scraperadjustmentnut
5.Rolleraxle
3.Lock-washer
6.Scraperlocknut
5.Orientthescraperassemblywiththebrushesup,and
insertthescrapermountingstudsthroughtheaxle
cross-shaftholesfromtheforwardsideoftheroller.
Looselysecurescraperwithlock-washerandscraper
locknut.
6.Rotatethescraperadjustment-nuttoobtainaclearance
betweenthescraperandrollerof0.030‒0.070inch
(0.762‒1.778mm)acrossthewidthofthescraper.
Tightenthescraperlocknut.
7.Loosentherollermountingscrew,tightenedinstep
3,
androtatethescraper/brushassembly(Figure2)to
positionitbehindtheroller.
Note:FormowerswiththeGroomerReelKit
installed,ensurethatthereisclearancebetweenthe
scraperassemblyandthegroomerblades.
1
3
2
4
5
4
G018209
Figure2
1.Frontofmachine
4.Fullroller
2.Scraper/brushposition
withoutgroomer
5.Groomer
3.Scraper/brushposition
withgroomer
8.Centertheroller/scraper/brushassemblybetweenthe
HOCarms.
9.Rotatethescraper/brushassemblydownuntilthe
desiredturfcontactisattained.
10.AttheHeight-of-Cut(HOC)arms,tightentheroller
mountingscrewsandthejamnutswhichsecurethe
rolleraxletotheHOCarms.
11.Installgrassbasketifremovedinstep
1.
©2012—TheToro®Company
8111LyndaleAvenueSouth
Bloomington,MN55420
Registeratwww.Toro.com.
OriginalInstructions(EN)
PrintedintheUSA.
AllRightsReserved