
Installation Instructions
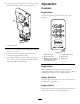


AdjustingtheNozzleDirection
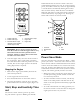
Thedirectionofthenozzleopeningcanbechanged
fromrighttoleftbypressingtheappropriatebuttonon
theremotecontrol(Figure13).
g017706
1 2
Figure13
1.Nozzledirection,left
2.Nozzledirection,right
Maintenance
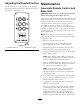
AssociateRemoteControland
BaseUnit
Important:Makesuretoreadtheentireprocedure
beforeattemptingtheAssociationprocess.
Theremotecontrolmustestablishcommunicationswith
thebaseunitbeforethesystemcanbeused.Theremote
controlisassociatedtothesystembaseunitbefore
leavingthefactory.ThisisdoneusingtheAssociate
procedure.Insituationswhereitisnecessaryto
re-establishremotecontrol-to-baseunitcommunications
(example:introducinganeworspareremotecontrolto
anexistingbaseunit),thefollowingAssociateprocedure
mustbeperformed.
Note:Associatingtheremotecontroltoadifferent
baseunitwilldisassociatethatremotecontrolfromthe
originalbaseunit.
1.Removepowerfromthebaseunit.
2.Standnearthebaseunitinunobstructed,clear
line-of-sightwiththeremotecontrolinhand.
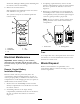
3.SimultaneouslypressandholdtheAssociateand
Disassociatebuttons.TXlightssteadyGreen.
4.ContinuetoholdbothbuttonsuntiltheLINKLED
beginsashingAmber.
Note:IftheashingLINKLEDgoessolid,the
Associationprocedureisabortedandmustbestarted
anewtoestablishthecommunicationlink.
5.WhentheLINKLEDashesAmber,releasethetwo
buttons.AllthreeLEDsashallowing2secondsfor
theoperatortoperformthenextstep.
Note:Ifthenextbuttonpressisnotperformed
within2seconds,theAssociationprocedureis
abortedandmustbestartedanewtoestablishthe
communicationlink.
6.PressandholdtheAssociatebutton.TheRXLED
goesout,theTXLEDlightssteadygreen,andthe
LINKLEDlightssteadyamber.
7.Applypowertothebaseunitwhilecontinuingto
holdtheAssociatebutton.
Theremotecontrolandbaseunitbegintoestablish
acommunicationlinkwhiletheAssociatebutton
isheld.Oncetheprocessiscomplete,theAmber
LINKLEDremainssolid,theRXLEDstops
ashingRedandtheTXLEDlightssteadyGreen
(buttonbeingheld)untilthebuttonisreleased,upon
6