
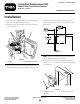
Installation Instructions


whichtimeTXbeginsashingGreenindicatingthat
theremotecontrolistransmitting.
8.ReleasetheAssociatebutton.
RXextinguishesandTXashesGreenforabrief
timeandthenittoogoesout.
Thesystemisreadyforusewiththatparticular
remotecontrol.
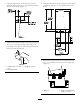
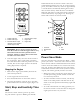
g017704
3
4
5
Figure14
1.Associate4.RX
2.Disassociate5.LINK
3.TX
ElectricalMaintenance
Important:Beforeweldingonthemachine,
disconnectthecontrollerandthenegativecable
fromthebatterytopreventdamagetotheelectrical
system.
RemoteControlBattery
Installation/Change
Remotecontrolunitsarepoweredbythreesize
AAAbatteries.Wheninstallingbatteries,besureto
observeproperpolarityasmarkedontheinsideofthe
compartmenttoavoiddamagingtheunit.Toreplaceor
installbatteriesintheremotecontrol:
1.RemovethefoursmallPhillipsscrewsfromthe
BatteryCompartmentcoverandliftthecoverfrom
theremotecontrol.
2.Ifinstallingbatteriesinanemptybattery
compartment,installthreefreshsizeAAAbatteries.
Besuretopositionthebatteriesasshownin
Figure15.
3.Ifreplacingexpiredbatteries,removetheold
batteriesandinstallthreefreshsizeAAAbatteries.
Besuretopositionthebatteriesasshownin
Figure15.
4.Replacethecompartmentcoverandtightenthe
fourPhillipsscrews.Thesescrewsshouldnotbe
over-tightened,buttheyshouldbetightenoughto
assurethegasketprovidesaproperseal.
Note:Besuretoobserveproperpolaritywhen
placingbatteriesintheremotecontrolbattery
compartment.
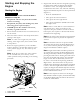
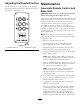
g017703
1
2
Figure15
1.Coverscrew2.Sealinggasket
Fuse
A15ampin-linefuseisincorporatedintothereceiver
wireharness.Itislocatedbehindthereceiveronthe
backsideofcontroltower.
WasteDisposal
Remotecontrolbatteriesarepollutantstothe
environment.Disposeoftheseaccordingtoyourstate
andlocalregulations.
7