
Installation Instructions


Note:Fileawaysharpedgesandburrs,and
applyTorotouchuppainttoanyareaswherebare
metalhasbeenexposed.
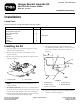
5.Installthenewhangerbracketsonthedeckbrackets
asshownin
Figure3andFigure4.
1
2
3
4
3
4
G018236
Figure3
Rearright-handsideshownfromtheleftside
1.Hangerbracket
3.Carriagebolt(existing)
2.Deckbracket
4.Nut(existing)
G018237
1
2
3
4
5
1
3
Figure4
Rearleft-handsideshownfromtherear
1.Nut(existing)
4.Deckbracket
2.Eccentric5.Hangerbracket
3.Carriagebolt(existing)
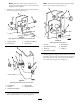
6.Installadecksupportbracketoneachhangerbracket
withashoulderboltandalocknut(Figure5).
Note:Installtheshoulderboltthroughtheupper
holeineachhangerbracket(Figure5).
G018238
1
2
3
4
5
7
6
Figure5
Rearright-handsideshown
1.Locknut
5.Shoulderbolt
2.Carriagebolt(existing)
6.Flatwasher
3.Clevispin7.Cotterpin
4.Decksupportbracket
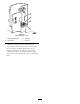
7.Afterhangingthehangerbracketsontherearliftrod,
installtheopenendofeachdecksupportbracketto
thehangerbracketwithaclevispin,aatwasher,
andacotterpin(
Figure5andFigure6).
2