
Installation Instructions

FormNo.3371-394RevA
PulleyKit
Model04252CuttingUnit
ModelNo.121-4666
InstallationInstructions
Note:Thiskitisforserialnumbers312000101—312000150only.
InstallingthePulleyKit
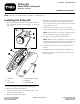
1.Removetheange-headboltsecuringthebeltcover
witha5/8inch(16mm)wrench(Figure1).Setboth
partsaside.
G017300
1
2
3
4
5
6
Figure1
1.Setscrew
4.Upperhousinglockingnut
2.Key5.Pulleybelt
3.Flatonshaft
6.Flange-headbolt
2.Loosentheupperhousinglockingnut(Figure1).
3.Removethepulleybelt(Figure1).
4.Loosenthe2setscrewsoneachpulleywitha3/32
inchallenwrench(Figure1).
5.Removeanddiscardthepulleys.
6.Installthenewpulleysatthedesiredclipusingthe
clipchartdecallocatedontheinsideofthebelt
cover.Ensurethatthetoothcountnumberstamped
onthepulleyfacesout.
7.Installthenewsetscrewswitha1/8inchallen
wrenchandtorquethemto60-65in-lb(6.5-7N-m).
Note:Ensurethatthe2setscrewsarealignedwith
thekeyandatonthepulleyshaft(
Figure1).
8.Installthepreviouslyremovedpulleybelt.
Note:Makesurethecompressionspringiscleanof
debrisallowingtheupperhousingtopivotfreelyand
isapplyingthepropertensiononthepulleybelt.
9.Carefullyrotatethereeloncetoequalizethebelt
tension.
10.Tightentheupperhousinglockingnut(
Figure1).
11.Installthebeltcoverwiththepreviouslyremoved
ange-headbolt.
©2011—TheToro®Company
8111LyndaleAvenueSouth
Bloomington,MN55420
Registeratwww.Toro.com.
OriginalInstructions(EN)
PrintedintheUSA.
AllRightsReserved