
Installation Instructions

FormNo.3379-203RevA
DepthGaugeKit
ProCore
®
SRAerator
ModelNo.125-3300
InstallationInstructions
WARNING
CALIFORNIA
Proposition65Warning
ThisproductcontainsachemicalorchemicalsknowntotheStateofCaliforniato
causecancer,birthdefects,orreproductiveharm.
Installation
1.DisengagethePTOandengagetheparkingbrake.
2.Stoptheengineandremovethekeyfromignition
switch.
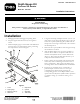
3.Mountthedepthgaugetotheatsideoftheslideblock
withtwo#10x1/2inchmachinescrews,positioning
thecomponentsasshownin
Figure1.
G024283
1
8
2
3
4
5
8
7
6
Figure1
1.Screw
5.Depthdecal
2.Depthgauge
6.Cylinder
3.Machinescrew(2)
7.Weldplate
4.Slideblock
8.Tubeclamp
4.Usingthetubeclamp,weldplateandtwo1/4x2–1/2
inchscrews,looselymountthedepthgaugetotherod
endofthetoplinkcylinder(Figure1).Makesurethe
clampsarelooseenoughtoallowthemtoberotatedto
thedesiredposition.
5.Makesurethetopofcylinderiscleanenoughtoexcept
theinstallationofadecal.
6.Afxthedepthdecaltothetopofthecylinderata
locationthatisvisibletotheoperatoranddoesnot
interferewithhydraulichosesorotherobstructions
(Figure1).Theendofthedecalwiththeletter“J”is
tobepositionedtowardtheaerator.
7.Checktomakesurethecylinderrodcanextendand
retractfullywithoutinterferingwithothertractoror
aeratorcomponents.Then,tightenthedepthgauge
mountingscrewswhenthedesiredlocationisattained.
8.Thelettersonthedecaldonotcorrespondtoa
particulardepth.Runtheaeratoronatestplot
todeterminethedesiredsettingandnotethe
correspondingpositiononthedepthindicator.The
operatorthencanadjustthecylinderwhileinoperation
toadeepersetting“J”orshallowersetting“ A”as
desired.
©2013—TheToro®Company
8111LyndaleAvenueSouth
Bloomington,MN55420
Registeratwww.Toro.com.
OriginalInstructions(EN)
PrintedintheUSA.
AllRightsReserved
*3379-203*A