
Installation Instructions

4.Slidetherollershaftoutoftheheight-of-cutarm
ontheoppositeendofthecuttingunit.
g021001
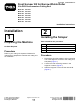
Figure1
1.Plowbolt4.Nut
2.Height-of-cutarm
5.Rollermountingscrew
3.Washer
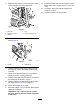
5.Insertashaftclampontoeachendoftheroller
shaft(Figure2).
g020965
Figure2
1.Scraper2.Shaftclamp
6.Looselyinstalltherollertothecuttingunitwith
theheight-of-cutarmandfastenerspreviously
removed.
7.Adjusttothedesiredheightofcutandtighten
height-of-cutarmmountingfasteners.
8.Positionthescraperbetweenthefrontrollerand
thecuttingunitasshowninFigure2.
9.Looselyinstallthescrapertoeachclampwitha
boltandnut(Figure2).Donottighten.
10.Centerthescraperontheroller.
11.Movethescraperinoroutuntilthedesiredroller
clearanceisattained.
Important:Thescrapermustnotcontact
theroller.Ensurethatthescraperisparallel
totheroller.
12.Tightentheboltsandnutssecuringtheclamps
totherollershaft.Torquethemto11N⋅m(96
in-lb).
13.Centertherollerandscraperbetweenthe
height-of-cutarms.
14.Tightentherollermountingscrews.
2