
Installation Instructions
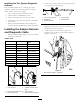
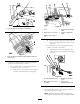
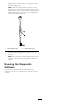
Table Of Contents

G024350
1
Figure4
1.Dustcap(DD4045rearbatterycompartment)
Figure5
1.Dustcap(directional-drillsexcepttheDD4045underthe
enginehood)
5.Connecttheadapterharnesstothediagnostic-port
connectorforthemachineasfollows:
•Foramachinewitha3-socketdiagnostic-port
connector,connectitasfollows:
A.Alignthetabontheadapter-harnessplugto
thelatchofthediagnosticport(
Figure6).
Figure6
1.Latch
4.Connector(3-pinadapter
cable)
2.Diagnostic-portconnector
5.Connector(diagnostic
cable)
3.Adapter-harnessplug(3
pin)
B.Firmlyinserttheplugintotheportuntilthe
latchofthediagnostic-portconnectorlocks
(
Figure6).
•Foramachinewitha9-socketdiagnostic-port
connector,connectitasfollows:
A.Alignthepinnotchonthediagnostic-port
tothepinnotchontheadapter-harnessplug
(Figure7).
G024357
1 2
3
4
Figure7
1.Pinnotch(diagnostic-port)
3.Adapter-harnessplug
(9-pin)
2.Diagnostic-portconnector
(9-socket)
4.Socketnotch
(adapter-harnessplug)
B.Firmlyinserttheplugintotheport(Figure7).
6.InserttheUSBconnectorofthediagnosticcableinto
theUSBportonthecomputer.
Note:Whenthediagnosticcableispluggedinto
thecomputerandthecomputerisrunning,thePWR
3