
Installation Instructions

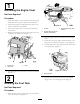


5.Usingthe2holes9.5mm(3/8inch)inthetopofthe
fueltank,securethehosetothetankwiththecable
tieasshowninFigure16.
8
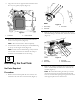
CheckingtheFuelSystem
NoPartsRequired
Procedure
1.Add2L(0.5USgallon)offueltothefueltank;refer
totheOperator’sManualforthemachine.
2.Rotatethetank-shutoffvalveclockwisetotheOn
position(Figure2).
3.Checkthebottomofthetank,fuelshutoffvalve,and
fuelhoseforleaks.
Note:Ifthereisafuelleak,rotatethefuelshutoff
valvetotheOffposition,andrepairtheleaksbefore
proceedingtothenextstep.
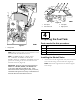
4.RotateengineswitchcounterclockwisetotheOn
position(Figure2).
5.Checktheengineswitchandthefuelhoseforfuelleaks.
Note:Ifthereisafuelleak,rotatethefuelshutoff
valvetotheOffposition,andrepairtheleaksbefore
proceedingtothenextstep.
6.Connectthespark-plugwiretotheterminalofthe
sparkplug(Figure3).
7.Startthemachine;refertotheOperator’sManualforthe
machine.
8.Checkthefuelsystemandengineforfuelleaks.
Note:Ifthereisafuelleak,immediatelyshutoff
themachine,rotatethefuelshutoffvalvetotheOff
position,andrepairtheleaks.
9.Shutoffthemachine.
9
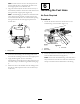
InstallingtheEngineCowl
NoPartsRequired
Procedure
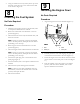
1.Aligntheenginecowloverthemachine(Figure17).
Figure17
1.Hole3.Latch
2.Guidepin
4.Latchpost
2.Carefullylowerthecowlwhilealigningtheguidepins
inthechassiswiththeholesinthecowl(Figure17).
3.Securetheenginecowltothechassiswiththe4latches
onthechassistothe4latchpostsonthecowl(Figure
17).
4.Startthemachine,movethehoppertotheupright
position,andshutoffthemachine;refertothe
Operator’sManualforthemachine.
8