
Installation Instructions
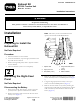

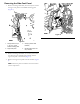
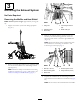
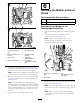
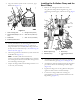
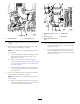
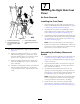

Figure13
1.Guillotineclamp5.Leftleg(bellows-alignment
jig)
2.Flangenut
6.Shorttab
(bellows-alignmentjig)
3.Bellows
(turbocharger-exhaust
pipe)
7.Rightleg
(bellows-alignmentjig)
4.Insideradius
(turbocharger-exhaust
pipe)
2.Assembletheguillotineclampthatyouremovedinstep
2ofRemovingtheMuferandHeatShield(page4)to
thebellows-alignmentjig(Figure13).
3.Aligntheleftlegofthejigtotheoutsideradiusofthe
bendinthepipeandtherightlegtotheinsideradius
ofthebendasshowninFigure13.
4.Tightentheangenutsoftheguillotineclampto19
to25N-m(14to18ft-lb).
InstallingtheTurbocharger-Exhaust
PipeandPipe-AlignmentJig
1.Assemblethenewturbocharger-exhaustpipetothe
outletangeoftheturbochargerwiththeangeclamp
thatyouremovedinstep5ofRemovingtheMufer
andHeatShield(page4)andtightentheangenutonly
enoughtokeepthepipealignedtotheturbocharger
(Figure14).
Figure14
1.Turbocharger-exhaust
pipe(withthebellowjig
installed)
3.Turbocharger-outletange
2.Flangeclamp
2.Loosenthe2ange-headbolts(10x20mm)that
securetheupper-rearheatshieldtothestandoffsofthe
exhaustmanifold(AofFigure15).
Note:Youwillhavetoloosentheboltssothatyou
have5mm(3/16)ormoreclearancebetweenthehead
oftheboltandtheheatshield.
6