
Installation Instructions


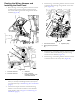


4.Atthecenterpunchmark,drilla5mm(3/16inch)
holethroughtherewall(Figure30).
Important:Coverthefuseblocktopreventmetal
shavingsfromtouchingtheblock.
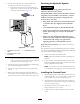
5.Assemblethe5-socketconnectortotherewall(Figure
30)withaange-headbolt(#10-32x3/4inch).
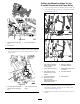
6.Assemblethetimerrelaytothe5-socketconnector
(Figure31).
Figure31
1.5-socketconnector2.Timerrelay
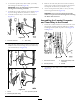
7.Aligntherelayand5-socketconnectorverticallyand
marktheholeinthemountingtabforthetimerrelay
ontotherewall(AofFigure32).
Figure32
1.Pencil
3.5mm(3/16inch)drillbit
2.Mountingtab(timerrelay)
8.Removethetimerrelayfromthe5-socketconnector,
removethe5-socketconnectorfromtherewall,and
centerpunchthemarkthatyoumadeinstep7.
9.Atthecenterpunchmark,drilla5mm(3/16inch)
holethroughtherewall(Figure32).
Important:Coverthefuseblockand5-socket
connectortopreventmetalshavingsfromtouching
theblockandconnector.
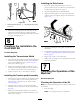
Assemblingthe5-socketConnector
andTimerRelaytotheFirewall
1.Securethe5-socketconnectortothelowerholeinthe
rewallwithaange-headbolt(#10-32x3/4inch)
andangelocknut(#10–32);refertoBinFigure30
andFigure33
Figure33
1.Frontofthemachine3.Flange-headbolt(#10-32
x3/4inch)
2.Locknut(#10-32)
4.Firewall
2.Assemblethetimerrelaytothe5-socketconnector
(Figure31).
13