
Installation Instructions


3.Repeatsteps1and2forthesidepanelattheotherside
ofthemachine.
4.Placebothsidepanelsintotheshippingcontainer.
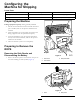
5.RotatetheBATTERYDISCONNECTswitch
counterclockwisetotheOFFposition(Figure5).
Figure5
1.BATTERYONposition2.BATTERYOFFposition
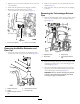
RemovingtheMuferExtensionand
RainCap
1.Loosentheclampthatsecuresthemuferextension
andraincaptotheoutletpipeofthemufer(Figure6).
Figure6
1.Mufer-outletpipe4.Inboardofthemachine
2.Clamp5.Pivot(raincap)
3.Muferextensionandrain
cap
2.Removetheextension,raincap,andclampfromthe
mufer(Figure6).
3.Placeextension,raincap,andclampintotheshipping
container.
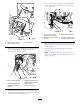
RemovingtheTurbocharger-Exhaust
Pipe
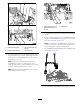
1.Removethebandclampandthelowerguillotineclamp
thatsecurethemufertotheturbocharger-exhaust
pipe(Figure7).
Figure7
1.Guillotineclamp
3.Flangeclamp
2.Bandclamp4.Turbocharger-exhaust
pipe
2.Removetheangeclampthatsecurestheangeofthe
turbocharger-exhaustpipetotheoutletangeofthe
turbocharger(Figure7).
3.Movetheturbocharger-exhaustpipedownuntilthe
alignmentpinsofthemufer-inletpipecleartheslots
intheturbocharger-exhaustpipe(Figure8).
Important:Donotbendordamagethepleated
sectionoftheturbocharger-exhaustpipewhile
removingthepipetothemachine.
3