
Use and Care Manual
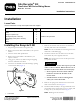
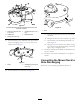
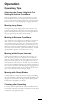


Figure2
Theside-dischargechutehasbeenremovedforthe
purposeofclarity.
1.Remove2plugboltsand
2nutshere.
4.Carriagebolt(5/16x3/4
inch)
2.Weldedpost
5.Bafeassembly
3.Flangenut(5/16inch)
11.Installthekickertotheundersideofthemowerdeck
using2self-tappingscrews(5/16x3/4inch)atthe
locationshowninFigure3.
Figure3
1.Kicker
2.Self-tappingscrews(5/16
x3/4inch)
12.InstallthedecaltotheareashowninFigure4.
G018015
1
Figure4
1.Decal
A.Thoroughlycleantheareawhereyouwillinstall
thedecal.
B.Dampentheareawithwaterormildlysoapywater.
C.Peelthedecalfromthebackingandinstallitin
place(Figure4).
D.Squeegeeacrossthesurfaceofthedecal,starting
atthecenterofthedecalandworkingtowardthe
edges,usingoverlappingstrokes.
13.Installthemulchingmowerbladesasdescribedinyour
Operator’sManual.
14.InstallthemowerdeckasdescribedinyourOperator’s
Manual.
ConvertingtheMowerDeckto
SideDischarging
ReversethestepsinInstallingtheRecyclerKitabove.
2