
Installation Instructions


ProductOverview
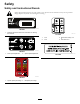
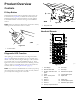
Controls
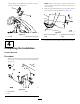
E-StopButton
Whennishedworkingwiththemachine,alwayspressthe
E-STOPbutton(Figure22)todisabletheelectricalsystem.
Whenbeginningworkwiththemachineyoumustpullthe
E-STOPbuttonbackoutbeforeturningonthehandheld
remote.
Note:FailuretopushtheE-Stopbuttoncanresultinbattery
dischargeifleftconnectedtothetowvehicle.
g013347
Figure22
1.E-STOPbutton
DiagnosticLEDFunction
AfterpullinguptheE-STOPbutton,thediagnosticLED
(Figure23)illuminatesandremainsonfor5seconds,turns
offfor5seconds,andthenbeginsashingat3Hz(3ashes
persecond)untilyouturnthehandheldremoteon.Ifthe
lightturnsonfor5secondsandthenstartsblinkingat10Hz
(withorwithouta5-secondpause),thereisafaultwiththe
machine;refertoCheckingFaultCodes(page17).
Note:Ifyouhavethehandheldremoteonwhenyoupullup
theE-STOPbutton,thelightdoesnotashat3Hz(3ashes
persecond)afterturningofffor5seconds.
g029961
Figure23
1.DiagnosticLED
HandheldRemote
g029772
Figure24
1.LCDdisplay
10.Floorstart
2.RemotestatusLED11.Floorstop
3.Allstart:startsoorand
option
12.Decreaseoorspeed
4.On/off13.Increaseoorspeed
5.Store:savespreset
settings
14.Optionstart
6.Preset1
15.Optionstop
7.Preset216.Increaseoptionspeed
8.Preset317.Decreaseoptionspeed
9.Allstop:stopsallfunctions
10