
Installation Instructions


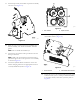

g035756
Figure16
1.Nut(3/8inch)4.Topof2-piecemount
2.Bolt(3/8x3/4inch)5.Bottomof2-piecemount
3.Hardenedwasher
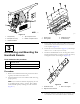
3
AssemblingandMountingthe
HandheldRemote
Partsneededforthisprocedure:
1Handheldremote
4AAbatteries
1Magneticbracket
Procedure
1.Removetherubberbandssecuringtheremotehalves
together,andremovethebackcover.
2.Installthebatteriesintotheterminalcradleobserving
properpolarity.
Note:Ifyouinstallthebatteriesimproperly,theunit
isnotdamaged,butitfailstooperate.Thecradleis
embossedwithpolaritymarkingsforeachterminal
(Figure17).
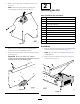
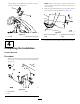
g035520
Figure17
1.Rubberseal3.Handheldremote
2.Steelgasket4.AAbatteries(4)
3.Ensurethatthesteelgasketandrubbersealareseated
inthechannelintheremotebeforeyousettheback
coverinplace(Figure17).
4.Securethecoverwith6screws(Figure17)andtorque
themto1.5to1.7N∙m(13to15in-lb).
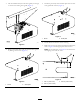
5.Installthehandheldremoteintothemagneticremote
bracket,slidethehalvestogethertosecuretheremote,
andtightentheboltinthemagnet(Figure18).
g028874
Figure18
1.Handheldremote3.Boltinthemagnet
2.Magneticremotebracket
6.Ifdesired,installthecontrollermountassemblyonthe
towvehicletostorethewirelessremote.Otherwise,
8