
Installation Instructions


InstallingtheFittingsand
RoutingtheHydraulicHoses
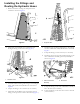
1.Removetheboltssecuringthesidepanelofthe
machineasshowninFigure5.
Figure5
2.Disconnectthehydraulichoseconnectedtothe
90-degreettingonthelowervalve(Figure6).
Figure6
1.Small-teevalve
3.Installthesmall-teettingandO-ringstothe90-degree
ttingandconnectthehydraulichoseasshownin
Figure6.
4.Torquethettingto36to44N-m(27to33ft-lbs).
5.Disconnectthehydraulichoseconnectedtothetee
ttingonthetopofthe9sectionvalveblock(Figure7).
Figure7
1.Large-teevalve
6.Installthelarge-teettingandO-ringstotheexisting
teevalveandconnectthehydraulichoseasshownin
Figure7.
7.Torquethettingto50to63N-m(37to47ft-lbs).
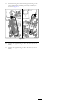
8.Installtheshorthosefromthesmall-teettingtothe
valveandbracketassemblypreviouslyinstalled,as
showninFigure8.
Figure8
1.Valveandbracket
assembly
2.Shorthose
9.Torquethettingonthevalveandbracketassemblyto
20to25N-m(15to19ft-lbs).
10.Torquethettingontheshorthoseto46to56N-m
(34to42ft-lbs).
3