
Installation Instructions


FormNo.3440-956RevA
BrakeandSignalLightKit
SerialNumber404399999andBeforeWorkman
®
GTXElectric
SeriesUtilityVehicle
ModelNo.133-7127
InstallationInstructions
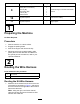
LooseParts
Usethechartbelowtoverifythatallpartshavebeenshipped.
ProcedureDescription
Qty.
Use
1
Nopartsrequired
–
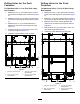
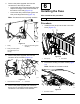
Preparethemachine.
Wireharness1
2
Cabletie
10
Routethewireharness.
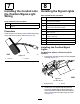
Brakeswitch1
Hex-headscrew(#6x1/2inch)
2
3
Locknut(#6)
2
Installthebrakeswitch.
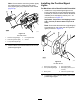
Flashermodule1
Hex-headscrew(1/4x5/8inch)
1
4
Flangenut(1/4inch)
1
Installtheashermodule.
Converter
1
Converterbracket
1
Self-tappingscrew(1/4x3/4inch)
6
Relay1
Hex-headscrew(#6x1/2inch)
2
5
Power-upgradewireharness1
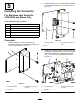
Installtheconverter(formachineswith
SerialNo.403448000andbelowonly).
6
Fuse(20A)
1
Installthefuse.
Conduit
2
7
Cabletie
4
Installtheconduitontothe
position/signal-lightwiring.
Frontposition/signallight
2
Frontposition/signal-lightbracket(for
machineswithaBrushGuardKit
installed)
2
Self-tappingscrew(1/4x1/2inch)
4
Frontposition/signal-lightbracket(for
machineswithoutaBrushGuardKit
installed)
2
Rearbrake/signallight
2
Largebrake/signal-lightbracket(for
machineswithasteelcargobed)
2
Smallbrake/signal-lightbracket(for
machineswithaplasticcargobed)
2
Hex-headscrew(5/16x3/4inch)
4
Spacer(5/16inch)
2
8
Self-tappingscrew(5/16x3/4inch)
4
Installthesignallights.
©2020—TheToro®Company
8111LyndaleAvenueSouth
Bloomington,MN55420
Registeratwww.T oro.com.
OriginalInstructions(EN)
PrintedintheUSA
AllRightsReserved
*3440-956*