
Installation Instructions


g234209
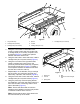
Figure2
1.Longtrailerstop
4.Spacer7.Carriagebolt(2-1/4inches)
2.Carriagebolt(6inches)
5.Locknut
3.Carriagebolt(4-3/4inches)6.Carriagebolt(3/4inch)
4.Usingthe2rearholesineachsideinsert,
mountaninserttoeachsideofthetrailerwith
2carriagebolts(2-1/4inches),2spacers,and
2locknuts(Figure2).Positionthespacers
betweentheinsertandtheside.
5.Usingtherearholesineachsideinsert,installa
carriagebolts(3/4inch)andlocknut(Figure2).
6.Usingthefrontholeontherightsideinsert,
installacarriagebolt(4-3/4inches),the
previouslyremovedshorttrailerstop,2spacers,
andalocknutasshowninFigure2.Position1
ofthespacersbetweentheinsertandtheside
andtheotherundertheouterlip.
7.Repeatstep6ontheleftside,usingacarriage
bolt(6inches),thepreviouslyremovedlong
trailerstop,2spacers,andalocknut(Figure2).
8.Usingthefrontholesineachsideinsert,installa
carriagebolts(3/4inch)andlocknut(Figure2).
9.Usingthepreviouslyremovedspringlatches
andfasteners,mountthenewwheelrodstothe
frontandrearsetsofmountingholesineach
sideofthetrailer(Figure3).
Note:Ensurethatthewheelrodwiththe
straightendisinstalledinthefrontrightposition
inthesamelocationastheoldone.
Note:Ensurethatthearmsofthewheelrods
areushwiththetopofthetrailer.
g234210
Figure3
1.Wheelrod4.Bolt
2.Locknut5.Wheelrodwithastraight
end
3.Springlatch
2