
Installation Instructions


InstallingtheBrushonCutting
UnitsEquippedwithGroomers
Note:Ifagroomerkitandabrushkitaregoingtobe
installedonthecuttingunit,installthegroomerkitrst.
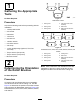
1.Removethe2groomercovermountingnutsand
removethecover(Figure20).
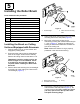
g009063
Figure20
1.Groomercover2.Covermountingnut(2)
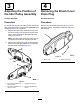
2.Removethe2angenuts(5/16inch)securing
thegroomerweighttothegroomercoverand
removetheweight(Figure21).
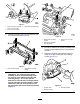
g009064
Figure21
1.Groomerweight(remove)
4.Rubbergrommetring
(includedwiththe
groomer)
2.Groomercover5.Coverscrews(remove)
3.Solidgrommet(remove)6.Setscrew(2)
3.Removethesolidgrommetfromthecoverand
replaceitwiththerubbergrommetringincluded
withthegroomer(Figure21).
4.Removethe2screws(5/16x1-1/4inch)
threadedintothecover(Figure21).
5.Removethesetscrewfromthecenterholein
thegroomercover(Figure21).
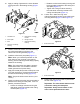
g009065
Figure22
1.Groomercover2.Grommet
6.Installthepreviouslyremovedsetscrewand
thesetscrewincludedwiththeGroomerKit,
intotheholespreviouslyusedforthecover
mountingscrews.Apply243Loctite(blue)tothe
setscrewspriortoinstallation.
Note:Thesetscrewsshouldbeushwiththe
groomercover.
7.Installthegroomercoverandsecureitwith2
angenuts(5/16inch)(Figure22).
Important:Donotovertightenthenuts.
8.Applygreasetotheinsidediameterofthe
grommetinthegroomercover(Figure22).
9.Removethe2nutssecuringeachrollerbracket
tothesideplates(Figure23).Donotremove
thebolts.
Note:Removeany6mm(1/4inch)spacers
positionedonthetopsideofthesideplate
mountingange.
10