
Installation Instructions
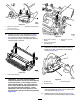
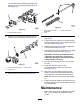


25.Checkthealignmentofthebelt/pulleysas
follows:
•Thebeltmustbeproperlytensioned
(installed)priortocheckingalignment.
•Layastraightedgealongtheouterfaceof
thedrivepulley(Figure33).Donotlay
thestraightedgeacrossboththedriveand
drivenpulleys.
g009060
Figure33
•Theouterfacesofthedriveanddriven
pulleysshouldbeinlinewithin0.76mm
(0.030inch).
•Ifthepulleysarenotaligned,Refertothe
sectiononPulleyAlignment.
•Ifthepulleysarealigned,continuewiththe
installation.
•Donotusetheidlerpulleytocheck
alignment.
Note:Thebeltmayfailprematurelyifthe
pulleysarenotproperlyaligned.
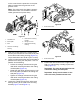
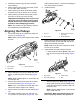
26.Slidethebeltcoverontothemountingboltsand
securewith2angenuts(Figure34).
Important:Donotovertightennutsas
damagetocovermayoccur.
g009071
Figure34
1.Beltcover
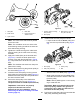
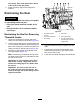
27.Lubricatethegreasettingsoneachoftheroller
brushbearinghousingsandontheremainder
ofthecuttingunitwithNo.2general-purpose,
lithium-basedgrease(Figure35).
Note:Wipeoffanyexcessgrease,specically
aroundtheexcluderseals.
g009072
Figure35
6
InstallingtheHigh
Height-of-CutBrushor
HDBrush(Optional)
Partsneededforthisprocedure:
–
Highheightofcutbrush(optional)
–
HDbrush(optional)
Procedure
Installthehighheight-of-cutbrushwhencuttingfrom
2.5to5.1cm(1to2inches)heightofcut(7maximum
spacersinstalledbelowthesideplatepad).:
•Part110-1740for22inchcuttingunits
•Part115-0838for27inchcuttingunits
•Part115-0849for32inchcuttingunits
InstalltheHDbrushforheavy-dutyconditions(worm
castings,clay,etc.).:
•Part137-0842for22-inchcuttingunits
•Part137-0844for27-inchcuttingunits
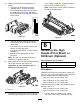
1.Ifarollerbrushisinstalledonthecutting
unit,removethe2bolts,washersandnuts
14